
Solar Panel Installation Made Simple: From Zero to Power in Your Home
Transform your home into a sustainable energy powerhouse by mastering the art of solar panel installation. Whether you’re a DIY enthusiast or considering a career change, comprehensive solar installation training equips you with essential skills to harness clean, renewable energy.
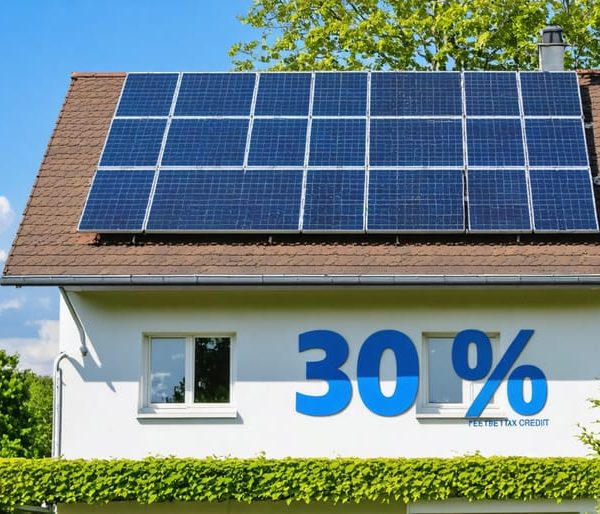
Solar installation combines technical expertise with practical hands-on work, offering both environmental benefits and significant cost savings. Modern systems can reduce electricity bills by 50-90%, while increasing property value by an average of 4.1%. With solar costs dropping 70% over the past decade and federal tax incentives covering up to 30% of installation costs, there’s never been a better time to learn this valuable skill.
Understanding solar installation fundamentals opens doors to both personal energy independence and professional opportunities in a rapidly growing industry. Today’s solar technology is more efficient, affordable, and user-friendly than ever before, making it accessible to motivated learners willing to invest time in understanding proper installation techniques and safety protocols.
Let’s explore how you can master solar installation, from basic system design to final grid connection, ensuring your renewable energy journey starts on solid ground. Whether you’re looking to install panels on your own home or launch a new career, this guide provides the foundational knowledge needed for successful solar implementation.
Essential Tools and Safety Equipment
Safety First: Required Protection
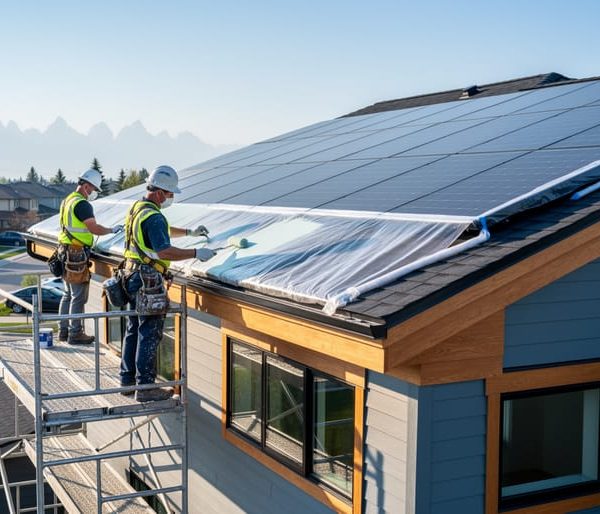
Safety should always be your top priority when installing solar panels. Before starting any installation work, ensure you have the following essential protective equipment: a sturdy safety harness for roof work, non-slip work boots with good grip, thick work gloves to protect against sharp edges, and safety glasses to shield your eyes from debris and sunlight.
A hard hat is crucial to protect against falling objects and accidental bumps, while long-sleeved shirts and pants made from durable materials guard against cuts and scratches. When working with electrical components, use insulated tools and rubber-soled shoes to prevent electrical shock.
Never work alone on solar installations – always have a partner on the ground who can assist in emergencies. Check weather conditions before starting work; avoid installation during rain, high winds, or extreme temperatures. Keep your work area clear of trip hazards and ensure all ladders are properly secured.
Remember to stay hydrated and take regular breaks, especially during hot weather. If you’re unsure about any safety aspect, consult with a professional installer or take a certified safety course before proceeding.

Tool Checklist
Before starting your solar installation journey, gather these essential tools to ensure a smooth and safe installation process:
Safety Equipment:
– Hard hat and safety glasses
– Non-slip work boots
– Heavy-duty work gloves
– Fall protection harness (for roof work)
Basic Hand Tools:
– Measuring tape and chalk line
– Claw hammer and rubber mallet
– Socket set and adjustable wrench
– Level (both standard and digital)
– Drill with various drill bits
– Wire strippers and crimpers
Specialized Solar Tools:
– MC4 connector assembly tools
– Solar panel lifting grips
– Angle finder for optimal panel positioning
– Digital multimeter for electrical testing
– Cable ties and conduit benders
Mounting Equipment:
– Roof anchor points and mounting brackets
– Flashing tools for roof penetrations
– Torque wrench for precise tightening
– Caulking gun for weatherproofing
Remember to invest in quality tools as they ensure proper installation and long-term system reliability. Keep all tools organized and easily accessible during the installation process. For electrical work, always use insulated tools rated for the appropriate voltage.
Site Assessment and Planning
Roof Evaluation
Before installing solar panels, a thorough roof evaluation is crucial for ensuring a safe and efficient solar system. Start by checking your roof’s structural integrity – it needs to support both the weight of the panels and withstand environmental factors. As outlined in our energy savings guide, a typical solar panel setup adds about 2.5-4 pounds per square foot to your roof load.
Assess your roof’s orientation and pitch. South-facing roofs in the Northern Hemisphere typically receive the most sunlight throughout the day, with an optimal tilt angle between 30-45 degrees. However, east and west-facing roofs can still be viable options, though they might produce about 15-20% less energy.
Look for any potential obstacles such as chimneys, vents, or nearby trees that could cast shadows on your panels. Shade can significantly reduce solar panel efficiency, so you’ll want to identify and address these issues before installation.
Check your roof’s age and condition. If your roof needs replacement within the next 5-10 years, consider doing this before installing solar panels. This prevents the added expense of removing and reinstalling panels later. Also, inspect for any existing damage, leaks, or weak spots that need repair.
Remember to verify local building codes and HOA regulations regarding solar installations, as these may affect your installation plans.
Sunlight Analysis
Before installing solar panels, conducting a thorough sunlight analysis is crucial for maximizing your system’s efficiency. Start by observing your roof’s sun exposure throughout the day, noting any shadows cast by nearby trees, buildings, or other structures. The ideal location receives direct sunlight between 9 AM and 3 PM, known as peak sun hours.
Use a solar pathfinder or smartphone apps designed for solar assessment to track sun patterns across different seasons. Remember that summer and winter sun paths vary significantly, affecting your panels’ performance throughout the year. Consider that even partial shade on one panel can reduce the efficiency of your entire solar array.
For optimal results, your roof should face south in the Northern Hemisphere, with a tilt angle roughly equal to your geographical latitude. However, east and west-facing roofs can still be viable options, typically generating about 80% of the energy compared to south-facing installations.
Take note of any potential future obstructions, such as growing trees or planned construction nearby. It’s better to address these concerns during the planning phase than after installation. If your roof has limited sun exposure, consider alternative mounting locations like ground installations or pergolas where sunlight is abundant.
Document your findings with photos and measurements, as this information will be essential for designing your solar panel layout and calculating potential energy production.

Mounting System Installation
Rail System Setup
The rail system serves as the backbone of your solar panel installation, so getting it right is crucial. Start by marking your roof attachment points according to your layout plan, ensuring they align with your roof’s rafters. For most residential installations, attachments should be placed every 4 feet along each rail line.
Next, install your roof attachments, making sure to properly flash and seal each mounting point to prevent water infiltration. If you’re working with composite shingles, carefully lift the shingles and insert the flashing underneath, then secure the mounting hardware.
Once your attachment points are secure, it’s time to connect the rails. Begin at one end of your planned array and work systematically across the roof. Make sure each rail section is level both horizontally and vertically – even small misalignments can affect your system’s performance and appearance.
Join rail sections using the manufacturer’s splicing hardware, maintaining proper torque specifications. Leave small gaps between rail sections to allow for thermal expansion and contraction. Use a string line or laser level to ensure your rails are perfectly aligned across the entire array.
Remember to maintain consistent rail spacing according to your panel specifications. Most residential panels require rails to be mounted 48-52 inches apart, but always verify with your specific panel documentation. Double-check all connections and ensure every bolt is properly tightened before moving on to panel installation.

Flashing and Waterproofing
Proper flashing and waterproofing are crucial steps in solar panel installation that protect your roof from potential water damage. Start by identifying all mounting points where the solar racking system will attach to your roof. Each of these points needs special attention to maintain your roof’s water-tight seal.
Begin by lifting the shingles around each mounting point carefully. Apply a high-quality roofing sealant underneath, then install flashing components that slide under the upper shingles. These metal or plastic pieces direct water away from the mounting holes. For added protection, use EPDM rubber gaskets around each lag bolt that secures the mounting hardware.
A common mistake is over-tightening the mounting bolts, which can crack the flashing or create dimples in your roof. Instead, follow the manufacturer’s torque specifications and ensure each bolt is snug but not overly tight. Apply a second layer of weatherproof sealant around each mounting point after installation.
For flat roofs, use appropriate flashing boots that create a watertight seal around posts and conduit penetrations. Consider installing a drip edge at the bottom of your array to prevent water from pooling behind the panels. Regular inspection of these waterproofing elements ensures your roof stays protected for years to come.
Remember, proper flashing isn’t just about preventing leaks – it’s about maintaining your roof’s integrity and protecting your solar investment.
Panel Installation Process
Panel Placement
Panel placement is a critical step that can make or break your solar installation’s efficiency. Start by marking your roof with chalk to indicate where each panel will go, following your installation plan’s layout. Ensure you maintain proper spacing between panels for ventilation and maintenance access – typically 1-2 inches between panels and 6-8 inches from roof edges.
Before mounting any panels, install your racking system securely. This involves attaching mounting brackets to your roof’s rafters, not just the shingles. Use a stud finder to locate rafters and pre-drill holes carefully to prevent roof damage. Apply weather-resistant sealant around each mounting point to prevent water infiltration.
When positioning panels, aim for a tilt angle that matches your latitude for optimal sun exposure. In most cases, this ranges between 30-45 degrees. If your roof pitch doesn’t match this ideal angle, mounting brackets can help achieve the correct tilt.
Work systematically from the bottom row up, ensuring each panel is level before securing it. Use a torque wrench to tighten mounting clamps to manufacturer specifications – overtightening can damage panels, while loose connections might fail during storms.
Remember to maintain consistent spacing and alignment throughout the array. This not only looks professional but also ensures proper airflow, which helps maintain panel efficiency. As you secure each panel, double-check its connections and mounting points. A properly placed panel array should be sturdy enough to withstand local wind conditions while maximizing solar exposure throughout the day.
Wiring Connections
Making proper electrical connections between solar panels is crucial for system safety and efficiency. Start by identifying your panels’ positive and negative terminals, typically marked with clear labels or color coding (red for positive, black for negative). Always work with the panels covered to prevent live voltage during connection.
For series connections, connect the positive terminal of one panel to the negative terminal of the next panel. This increases your system’s voltage while maintaining the same current. For parallel connections, link all positive terminals together and all negative terminals together, which increases current while maintaining voltage.
Use MC4 connectors, the industry standard for solar installations, to ensure weatherproof and secure connections. These connectors snap together firmly and require a special tool to disconnect, preventing accidental separation. When routing wires, secure them with UV-resistant cable ties and protect them from environmental damage using proper conduit.
Remember to maintain proper wire sizing based on your system’s current requirements. A good rule of thumb is to use 10 or 12 AWG copper wire for most residential installations, but always consult your system specifications. Leave enough slack in the wires to prevent strain while keeping them neat and organized.
Before making final connections to your inverter, double-check all connections with a multimeter to verify proper voltage and polarity. This simple step can prevent damage to expensive equipment and ensure optimal system performance. If you’re unsure about any electrical connections, don’t hesitate to consult a certified solar installer.
Inverter Setup and System Testing

Inverter Installation
The inverter is the heart of your solar power system, converting DC power from your panels into usable AC electricity for your home. Choose a location that’s cool, dry, and easily accessible – typically in your garage or utility room. Ensure the mounting surface can support the inverter’s weight and allow for proper ventilation, leaving at least 6 inches of clearance on all sides.
Begin by marking your mounting points using the inverter’s mounting bracket as a template. Drill pilot holes and secure the mounting bracket with appropriate anchors and screws. If mounting on concrete, use masonry anchors for added stability. Remember to keep the inverter vertical and level for optimal performance.
Before connecting any wiring, turn off all power sources, including your main electrical panel. Connect the DC cables from your solar array to the designated input terminals, maintaining correct polarity (positive to positive, negative to negative). Next, connect the AC output to your home’s electrical system through the appropriate circuit breaker.
Ground the inverter according to local electrical codes using proper grounding wire and connections. Double-check all connections to ensure they’re tight and secure. Many modern inverters include built-in monitoring capabilities – connect these to your home’s Wi-Fi network for real-time performance tracking.
Always consult your inverter’s manual for specific installation requirements and consider hiring a certified electrician for the final connections to ensure safety and code compliance.
System Testing
Once all components are installed, it’s crucial to perform thorough system testing before connecting to the grid. Start by double-checking all electrical connections, ensuring they’re tight and properly insulated. Pay special attention to the junction boxes and grounding wires, as these are critical safety components.
Using a multimeter, test the voltage output from your solar panels individually and as a complete array. This helps verify that each panel is functioning correctly and producing the expected voltage. Remember to test during peak sunlight hours for the most accurate readings.
Next, inspect the inverter’s display panel for any error messages or unusual readings. Modern inverters typically have built-in monitoring capabilities that let you monitor your solar system performance in real-time.
Run a complete system test by turning on the solar array and observing power generation. Check that your meter shows proper energy flow and that all safety disconnect switches are functioning correctly. Look for any unusual sounds, smells, or heat from components during operation.
Finally, document all test results and initial power readings. This creates a baseline for future performance comparisons and helps identify potential issues early. Remember, it’s better to discover and address problems during testing than after the system is fully operational.
Congratulations on taking this important step toward energy independence through solar installation! Throughout this guide, we’ve covered the essential aspects of installing your own solar system, from initial assessment and planning to the final connection and testing phases. Remember that proper installation is crucial for both safety and optimal performance of your solar panels.
By following the detailed steps and safety guidelines we’ve discussed, you’re well-equipped to undertake this rewarding project. However, don’t hesitate to consult professionals when needed, especially for complex electrical work or roof modifications. Your local building department and utility company remain valuable resources throughout the installation process.
To ensure your solar system continues performing at its best, regular maintenance is essential. Check out our comprehensive solar panel maintenance tips to protect your investment and maximize energy production for years to come.
Consider joining local solar enthusiast groups or online communities to share experiences and learn from others who’ve completed similar installations. As solar technology continues to evolve, staying informed about new developments and best practices will help you make the most of your system.
Remember, your solar journey doesn’t end with installation. Monitor your system’s performance regularly, keep documentation of all maintenance activities, and celebrate the positive impact you’re making on both the environment and your energy bills. With proper care and attention, your solar installation will provide clean, renewable energy for decades to come.


