
Solar Panel Success: Your Start-to-Finish Installation Blueprint
Transform your home into a sustainable powerhouse with a professional solar installation that delivers lasting energy savings with solar. Whether you’re a DIY enthusiast or planning to work with professionals, understanding the solar installation process is crucial for making informed decisions about your renewable energy journey.
This comprehensive guide walks you through every critical phase of solar panel installation, from initial site assessment to final system activation. You’ll discover how to evaluate your roof’s structural integrity, determine optimal panel placement for maximum sun exposure, and navigate local building codes and permits. We’ll also explore essential components like inverters, mounting systems, and electrical connections while emphasizing safety protocols that protect both installers and homeowners.
By following our detailed instructions, you’ll gain the confidence to either tackle the installation yourself or effectively communicate with solar professionals. With solar panel costs continuing to decrease and efficiency improving yearly, there’s never been a better time to harness the sun’s power for your home’s energy needs.
Planning Your Solar Installation
Site Assessment and Solar Potential
Before diving into DIY solar panel installation, it’s crucial to assess your property’s solar potential. Start by examining your roof’s orientation – south-facing surfaces in the Northern Hemisphere typically receive the most sunlight throughout the day. Check for any obstacles like tall trees, neighboring buildings, or chimneys that might cast shadows on your panels.
Use a solar pathfinder or smartphone apps designed for solar assessment to track sun exposure throughout different seasons. The ideal roof pitch should be between 30-45 degrees, though panels can be installed on most angles with proper mounting equipment.
Consider your roof’s condition and structural integrity. Solar panels typically last 25-30 years, so your roof should be in good shape or may need repairs before installation. Measure your available roof space, keeping in mind that an average residential solar panel is about 65 inches by 39 inches.
Look for areas free from vents, satellites, or other rooftop equipment. Remember that panel efficiency is affected by local weather patterns and latitude. Online solar calculators can help estimate your potential solar generation based on these factors. Some local utilities even offer free site assessments to help determine the best locations for your panels.
Keep local building codes and HOA restrictions in mind, as these may affect where you can place your panels. Document your findings to help plan your installation effectively.

Permits and Regulations
Before starting your solar installation project, you’ll need to navigate the necessary permits and regulations in your area. Most jurisdictions require building permits and electrical permits for solar installations, which typically involve submitting detailed system plans and paying associated fees.
Start by contacting your local building department to understand specific requirements. They’ll provide information about zoning laws, setback requirements, and height restrictions that may affect your installation. Some neighborhoods, especially those with homeowners’ associations (HOAs), may have additional aesthetic guidelines or restrictions.
You’ll also need to ensure your installation meets National Electrical Code (NEC) requirements and local fire safety regulations. Many areas require specific setback spaces on roofs for firefighter access and safety. Your utility company will need to approve your system before it can be connected to the grid, so request their interconnection requirements early in the process.
Documentation typically needed includes:
– Detailed system design plans
– Structural engineering calculations
– Electrical diagrams
– Site plans showing panel placement
– Equipment specifications
Consider working with a certified solar installer who’s familiar with local requirements. They can handle permit applications and ensure compliance with all regulations. Remember that permit processing times vary by location, so factor this into your project timeline to avoid delays.
Keep all approved permits and documentation for future reference, as they may be needed for insurance purposes or when selling your property.
Essential Tools and Materials
Solar Components Checklist
Before starting your solar installation journey, ensure you have all the essential components ready. Here’s your comprehensive checklist:
Main Components:
• Solar panels (photovoltaic modules)
• Solar inverter (string or microinverters)
• Mounting system and rails
• Power meter
• Battery storage system (optional)
Electrical Components:
• DC disconnect switch
• AC disconnect switch
• Junction boxes
• Conduit and wiring
• Grounding equipment
• Circuit breakers
Hardware and Tools:
• Mounting brackets and clamps
• Flashing for roof penetrations
• Weather-resistant wire connectors
• Cable ties and clips
• Junction box covers
• Sealants and waterproofing materials
Safety Equipment:
• Hard hat
• Safety harness
• Non-slip boots
• Work gloves
• Safety glasses
• Fall protection system
Remember to verify that all components meet local building codes and are compatible with each other. It’s also wise to have extra connectors and small hardware on hand, as these items are easily misplaced during installation. Each component plays a crucial role in creating a safe, efficient, and long-lasting solar power system.
Tool Requirements
Before starting your solar installation project, gather these essential tools to ensure a smooth and safe installation process:
Basic Hand Tools:
– Measuring tape and pencil
– Hammer and rubber mallet
– Socket set and wrenches
– Screwdrivers (Phillips and flathead)
– Wire strippers and crimpers
– Level (both standard and digital)
Safety Equipment:
– Safety harness and rope
– Non-slip work boots
– Safety glasses and gloves
– Hard hat
– Dust mask
Specialized Equipment:
– Angle finder (for roof pitch)
– MC4 connector assembly tools
– Multimeter for electrical testing
– Drill with various bits
– Conduit bender
– Solar panel lifting equipment
Optional but Recommended:
– Extension ladder with stabilizer
– Battery-powered impact driver
– Cable ties and organizers
– Angle grinder
– Stud finder
Remember to inspect all tools before use and ensure electrical testing equipment is properly calibrated. Having a complete toolkit ready before starting will prevent delays and ensure professional-quality installation results.

Step-by-Step Installation Process
Mounting System Installation
The mounting system serves as the foundation for your solar panels, so proper installation is crucial for long-term stability and safety. Before beginning the complete installation process, carefully inspect your roof’s condition and mark the locations for mounting points using a chalk line.
Start by installing the flashing at each mount location. These waterproof barriers prevent moisture from seeping into your roof. Place them under the existing shingles and secure them with roofing screws and sealant. Make sure to maintain proper spacing between mounts according to your system’s specifications and local wind load requirements.
Next, attach the L-feet or mounting brackets to the flashing. Use stainless steel lag bolts that penetrate at least 2.5 inches into the roof rafters for maximum stability. A stud finder can help you locate these structural supports accurately. Remember to apply weatherproof sealant around each mounting point to ensure a watertight seal.
Once the mounting points are secure, install the horizontal rails that will support your solar panels. These rails should be perfectly level and parallel to each other. Use a laser level to ensure precise alignment, as even small discrepancies can affect panel efficiency. Connect the rails to the L-feet using the manufacturer’s recommended hardware and torque specifications.
Add any necessary rail splices to join sections together, ensuring they align perfectly. Install end caps on the rails to prevent water accumulation and improve aesthetics. Before moving forward with panel installation, double-check all connections and ensure every component is properly tightened.
Take extra care when walking on the roof during installation. Use appropriate safety equipment, including a sturdy harness, and work with a partner whenever possible. If you’re unsure about any aspect of the mounting system installation, don’t hesitate to consult with a professional – the long-term security of your solar investment depends on this crucial foundation.

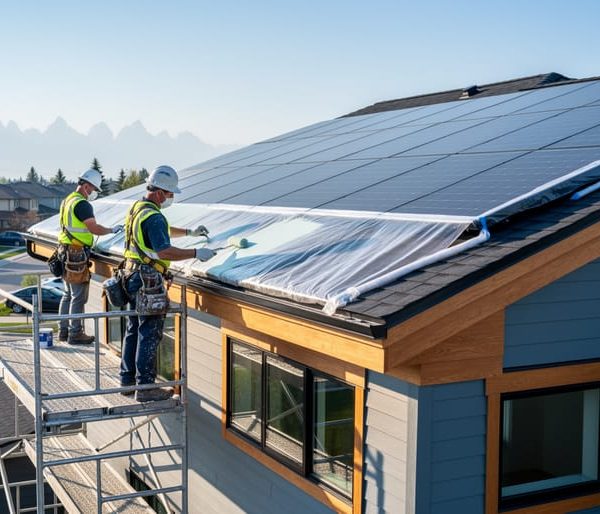
Panel Placement and Securing
Once your mounting rails are securely in place, it’s time for the exciting part – installing the actual solar panels. Start by carefully lifting each panel with a partner, as they typically weigh between 40-50 pounds. Never attempt to place panels alone, as this could lead to injury or damage to the equipment.
Position the first panel at the edge of your mounting rails, ensuring it’s perfectly aligned. Most modern solar panels come with pre-drilled holes that match up with the mounting hardware. Before securing any clamps, double-check that the panel is square with your roof line and properly oriented for optimal sun exposure.
Install mid-clamps between panels and end-clamps at the outer edges. Mid-clamps hold two adjacent panels together while end-clamps secure the outer edges of your solar array. Tighten these clamps to the manufacturer’s recommended torque specifications – not too tight to avoid damage, but secure enough to withstand strong winds.
Leave a small gap (usually about 1/2 inch) between panels to allow for thermal expansion and contraction. This gap also helps with airflow, which helps maintain panel efficiency. Work systematically across your roof, installing one row at a time and checking level as you go.
Remember to secure any loose wiring with UV-resistant zip ties or clips designed specifically for solar installations. Tuck excess wiring neatly underneath the panels, ensuring no cables hang down or create tripping hazards.
Once all panels are in place, perform a final inspection. Check that all clamps are properly tightened, panels are aligned correctly, and there’s no visible damage to any components. This is also a good time to take photos of your installation for documentation purposes.
A well-executed panel placement not only looks professional but also ensures optimal performance and longevity of your solar system. Take your time with this crucial step – rushing the installation could lead to problems down the line.

Electrical Wiring and Connections
Electrical wiring and connections are crucial aspects of solar installation that require careful attention to safety and precision. Before beginning any electrical work, ensure the main power supply is completely disconnected and proper safety equipment, including insulated gloves and tools, is readily available.
Start by connecting the solar panels in series or parallel, depending on your system design. For series connections, link the positive terminal of one panel to the negative terminal of the next. In parallel configurations, connect all positive terminals together and all negative terminals together. Double-check all connections to ensure they’re tight and properly insulated.
Next, run the main DC cables from your solar array to the inverter location. Use appropriate gauge wire based on your system’s voltage and current requirements, and always include a slight slack in the cables to prevent strain. Install proper conduit to protect wiring from environmental damage and meet local building codes.
Install the necessary disconnect switches between the solar panels and inverter, and between the inverter and your main electrical panel. These safety devices are essential for maintenance and emergency situations. Mount the inverter in a cool, dry location, following manufacturer specifications for clearance and ventilation.
When connecting to your home’s electrical panel, install a dedicated circuit breaker sized appropriately for your system. This connection must be made by a licensed electrician in most jurisdictions. The final step involves installing a bi-directional meter if you’re connecting to the grid, which will track both energy consumption and production.
Remember to thoroughly test all connections using a multimeter before activating the system. Document your wiring diagram and take photos of connections for future reference. While DIY installation is possible, consider consulting a professional electrician for this critical phase to ensure safety and compliance with local regulations.
Ground all equipment properly to protect against electrical surges and lightning strikes. This includes bonding the solar panel frames and mounting equipment to your home’s grounding system.
Inverter Setup and System Testing
The inverter installation marks a crucial step in bringing your solar system to life. Begin by identifying the ideal location for your inverter – it should be in a cool, dry space away from direct sunlight, preferably near your main electrical panel. Most homeowners choose their garage or utility room for this purpose.
Before mounting the inverter, ensure you have all necessary brackets and hardware. Follow the manufacturer’s guidelines for minimum clearances around the unit to allow proper ventilation. Mount the inverter securely to the wall, making sure it’s level and at a comfortable height for access.
Connect the DC cables from your solar panels to the appropriate terminals on the inverter, maintaining correct polarity. Then, establish the AC connection to your home’s electrical system through a dedicated circuit breaker. This step should only be performed by a qualified electrician if you’re not confident with electrical work.
Next, focus on the monitoring system setup, which allows you to track your system’s performance. Most modern inverters come with built-in Wi-Fi capability – connect it to your home network following the manufacturer’s instructions.
Once all connections are secure, it’s time for initial testing. First, turn on the DC disconnect switch, followed by the AC breaker. Watch for indicator lights on the inverter showing proper startup sequence. Many inverters have a display screen showing real-time power production and system status.
Perform a thorough test during daylight hours to ensure your system is generating power as expected. Check for any error messages or unusual sounds. Monitor the system’s output for several hours, comparing it with the expected production based on your system’s size and current weather conditions.
Remember to document all settings and take photos of the final installation for future reference. This documentation will be valuable for maintenance and troubleshooting down the line.
Post-Installation Steps
System Inspection and Activation
Once your solar installation is complete, it’s time for the final inspection and system activation. Your local building department will send an inspector to verify that your installation meets all safety codes and regulations. They’ll check the mounting system, electrical connections, and grounding equipment to ensure everything is up to standard.
During this inspection, have your installation documentation ready, including permits and engineering calculations. The inspector will verify that your system matches the approved plans and meets local building codes.
After passing inspection, your utility company will install a new bi-directional meter that tracks both energy consumption and production. They’ll then grant permission to operate (PTO), allowing you to officially activate your solar system.
Before flipping the switch, double-check all connections and conduct a final walkthrough with your installer. They’ll show you how to monitor your system’s performance and explain basic maintenance requirements. Once activated, you can start generating clean, renewable energy and tracking your solar production through your monitoring system.
Remember to keep all documentation and warranty information in a safe place for future reference.
Maintenance Schedule
Regular maintenance is crucial for keeping your solar installation performing at its peak. Create a quarterly schedule to check for dust, debris, and potential damage. Clean your panels every three months using gentle cleaning methods – check out our detailed solar panel maintenance tips for the best cleaning practices.
Monitor your system’s performance monthly through your inverter display or monitoring app. Inspect mounting hardware and wiring connections twice a year for any signs of wear or loosening. During spring and fall, trim nearby trees or vegetation that might cast shadows on your panels.
Schedule a professional inspection annually to check electrical connections, inverter performance, and overall system efficiency. Keep detailed maintenance records, including cleaning dates, energy production data, and any repairs. This helps track system performance and identify potential issues early, ensuring your solar investment continues to deliver optimal returns for years to come.
Taking the leap into solar energy installation is an exciting step toward a more sustainable and cost-effective future. Throughout this guide, we’ve covered everything from initial site assessment and equipment selection to the final connection and testing procedures. Remember that proper planning, safety precautions, and attention to detail are crucial for a successful solar installation project.
Whether you’re a DIY enthusiast ready to tackle the installation yourself or simply wanting to understand the process better before hiring professionals, you now have a solid foundation of knowledge. The benefits of solar energy extend far beyond reduced electricity bills – you’re contributing to a cleaner environment and energy independence for generations to come.
Don’t let the complexity of solar installation intimidate you. With the right tools, knowledge, and support, you can navigate this journey successfully. If you feel uncertain about any aspect of the installation, don’t hesitate to consult with certified professionals. Your solar journey starts here – take that first step toward powering your home with clean, renewable energy today.


