Solar Post Cap Lights That Transform Your Deck (6×6 Installation Guide)
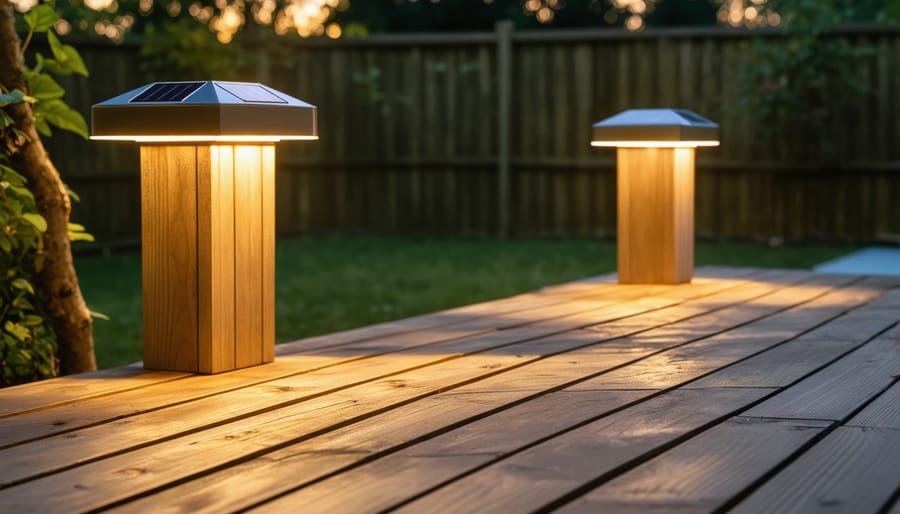
Transform your deck posts into elegant, eco-friendly lighting fixtures with 6×6 solar light post caps – the perfect blend of sustainability and style for modern outdoor spaces. As a standout among outdoor solar lighting options, these innovative caps harness sunlight during the day to create enchanting illumination at night, all while requiring zero electrical wiring or ongoing energy costs.
Designed specifically for standard 6×6 posts, these durable caps serve dual purposes: protecting your posts from weather damage while providing automatic dusk-to-dawn lighting that enhances both safety and ambiance. Their weatherproof construction and efficient LED technology ensure years of reliable performance, making them an intelligent investment for environmentally conscious homeowners looking to upgrade their outdoor spaces.
Whether you’re illuminating a deck, fence line, or garden pathway, these solar-powered caps offer a perfect combination of practical functionality and sophisticated design. With various styles ranging from classic to contemporary, and light colors from warm white to cool blue, you can easily find the perfect match for your outdoor aesthetic while contributing to a more sustainable future.
Why 6×6 Solar Post Caps Are Worth Your Investment
Energy Cost Savings
Switching to 6×6 solar light post caps can lead to significant energy cost savings while enhancing your landscape lighting design ideas. A typical traditional post cap light using 7-watt bulbs, running 12 hours daily, consumes about 30.66 kWh annually per light. With an average electricity rate of $0.14 per kWh, each traditional post cap costs approximately $4.29 yearly to operate.
Solar post caps eliminate these electricity costs entirely, running on free solar power. For a typical deck with eight post caps, this translates to annual savings of around $34.32. While the initial investment might be slightly higher than traditional caps, most homeowners recover the difference within 2-3 years through energy savings alone.
Beyond direct electricity savings, solar post caps reduce your carbon footprint and require less maintenance, as there’s no need for electrical wiring or bulb replacements. The LED lights used in solar caps typically last 50,000+ hours, further reducing long-term costs and environmental impact. Plus, you’ll never have to worry about increased energy bills or power outages affecting your outdoor lighting.
Environmental Impact
By choosing 6×6 solar light post caps, you’re making a significant positive impact on the environment. These eco-friendly lighting solutions harness clean, renewable solar energy, eliminating the need for traditional electrical power and reducing your carbon footprint. Each solar post cap can save approximately 12-15 watts of energy per day compared to conventional electric caps.
Over their lifetime, solar post caps can prevent hundreds of pounds of carbon emissions from entering the atmosphere. A typical installation of 10 post caps can offset the equivalent of planting two trees in terms of annual carbon reduction. Since they operate independently of the power grid, these lights also help reduce strain on local electrical infrastructure during peak usage hours.
The LED bulbs used in solar post caps are not only energy-efficient but also have a longer lifespan than traditional bulbs, reducing waste and the need for frequent replacements. Most components are recyclable, and many manufacturers now use sustainable materials in their production processes. By investing in solar post caps, you’re participating in the growing movement toward sustainable outdoor lighting while creating an inviting atmosphere for your outdoor space.
Top Features to Look For
Light Output and Duration
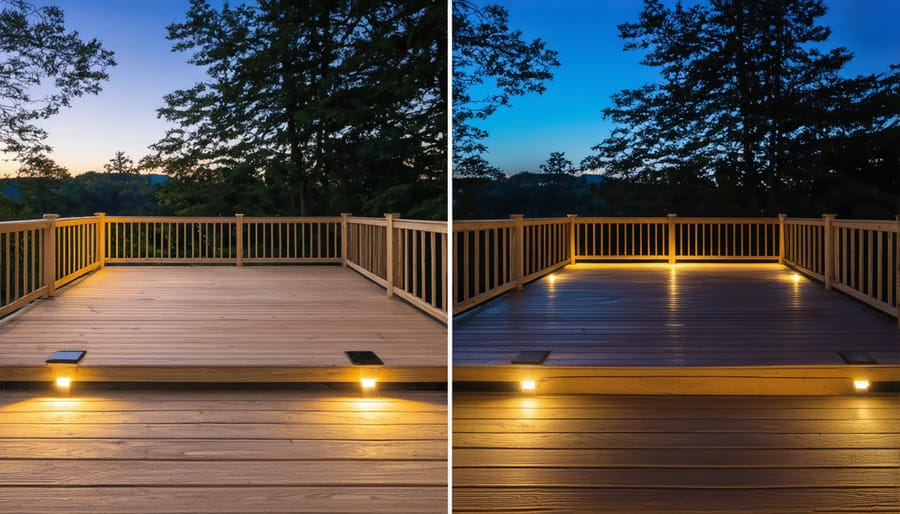
Modern 6×6 solar light post caps pack impressive illumination power, typically producing between 15-25 lumens per cap – perfect for creating an inviting ambiance without overwhelming brightness. These solar-powered fixtures efficiently store energy during daylight hours, providing reliable illumination for 8-12 hours after dusk, depending on seasonal sunlight exposure and weather conditions.
The integrated rechargeable batteries, usually lithium-ion or NiMH, reach full charge within 6-8 hours of direct sunlight. Most models feature automatic dusk-to-dawn operation, eliminating the need for manual switching while ensuring optimal energy usage. During winter months or overcast days, expect slightly reduced duration, though many models include smart power management systems that adjust output to maintain consistent lighting throughout the night.
The expected lifespan of solar lights varies, but quality post caps typically last 2-3 years before battery replacement becomes necessary. The LED bulbs themselves can last up to 50,000 hours, translating to many years of reliable service. Many manufacturers now include multiple lighting modes, allowing users to choose between full brightness, dim mode, or even decorative effects, helping extend battery life while maintaining desired illumination levels.
For optimal performance, position your post caps where they receive maximum direct sunlight, and keep the solar panels clean from debris and dust. This simple maintenance ensures maximum charging efficiency and longest possible nighttime illumination.
Weather Resistance
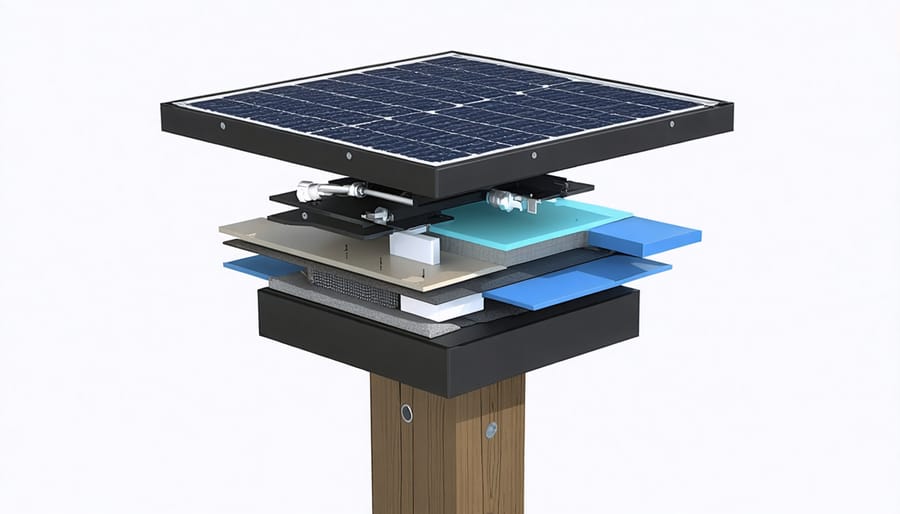
Built to withstand nature’s challenges, 6×6 solar light post caps feature robust weather-resistant construction that ensures long-lasting performance in various outdoor conditions. These fixtures typically carry an IP65 or IP66 rating, meaning they’re completely protected against dust and can withstand powerful water jets from any direction.
The outer housing is crafted from high-grade UV-resistant materials, preventing yellowing and degradation from prolonged sun exposure. This protection extends to the internal components, including the solar panels, LED lights, and circuitry, which are sealed against moisture infiltration.
Most quality solar post caps incorporate special drainage channels that prevent water accumulation, while sealed gaskets protect sensitive electrical components from rain and snow. The polycarbonate or tempered glass lenses are specifically designed to resist impacts from hail and falling branches.
Temperature resilience is another key feature, with most models rated to function effectively from -4°F to 140°F (-20°C to 60°C). The rechargeable batteries are also protected by temperature-regulation technology that maintains optimal charging conditions in both hot and cold weather.
For coastal areas, many manufacturers offer models with additional corrosion resistance, featuring special coatings that protect against salt spray and maritime conditions. This comprehensive weather protection ensures your investment continues to illuminate your outdoor spaces reliably, season after season, with minimal maintenance required.
Installation Made Simple
Tools and Materials
To ensure a smooth installation of your 6×6 solar light post caps, gather these essential tools and materials before you begin:
Essential Tools:
• Measuring tape
• Pencil or marker
• Phillips head screwdriver
• Drill with appropriate bits
• Level
• Safety glasses
• Work gloves
• Ladder or step stool (if posts are tall)
Required Materials:
• 6×6 solar light post caps (quantity depends on your needs)
• Mounting screws (usually included with post caps)
• Wood screws (if additional securing is needed)
• Post cap adapters (if posts are slightly smaller than 6×6)
• Silicone sealant (weather-resistant)
• Clean cloth or rag
• Sandpaper (medium-grit)
Optional but Recommended:
• Weather stripping tape
• Rubber mallet
• Post preservative
• Small brush for cleaning
• Carpenter’s square
Pro tip: While most solar post caps come with mounting hardware, it’s wise to have extra screws on hand. Also, check your existing post measurements carefully, as wood posts can vary slightly in size due to weathering or manufacturing differences.
Installation Steps
Installing 6×6 solar light post caps is a straightforward process that you can complete in about 30 minutes. Before beginning, ensure you have a measuring tape, screwdriver, and safety gloves. For your safety, choose a dry, clear day for installation.
Start by removing any existing post caps from your deck posts. Clean the top surface of each post thoroughly, removing any debris, dirt, or old adhesive. This ensures proper fitting and maximum stability of your new solar caps.
Next, measure your post tops to confirm they’re exactly 6×6 inches. While these caps are designed for standard 6×6 posts, wood can sometimes vary slightly in size. If needed, sand down any rough edges that might prevent a snug fit.
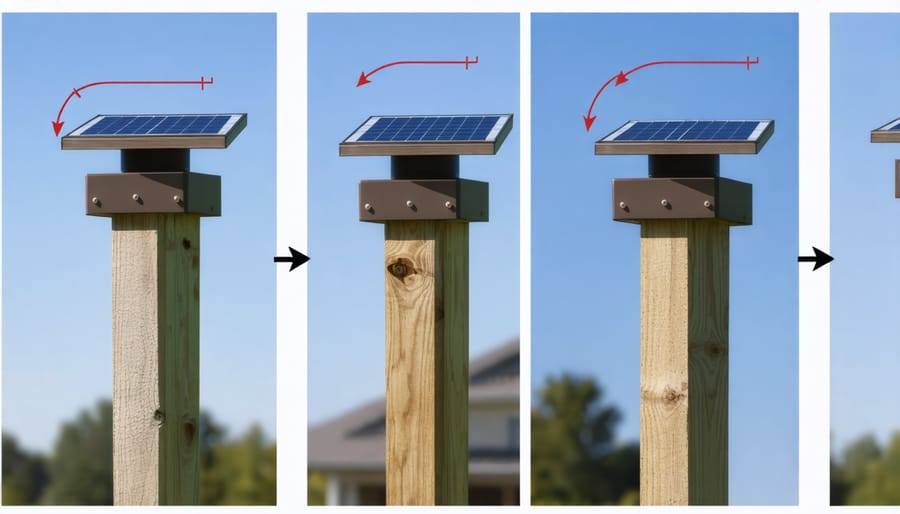
Turn on your solar light caps and test them before installation. Place them in direct sunlight for about 2-3 hours to ensure they’re working correctly. Once confirmed, apply a small amount of exterior-grade adhesive to the inside edges of the cap (if provided with your product).
Carefully align and place the cap onto the post, ensuring it’s level and facing the desired direction. Some models have specific orientation requirements for optimal solar collection. Press down firmly and hold for 30 seconds to secure the initial bond.
For extra security, especially in windy areas, use the provided mounting screws through the pre-drilled holes. Don’t overtighten, as this could crack the cap’s housing. Allow the adhesive to cure completely according to the manufacturer’s instructions before exposing to rain.
Troubleshooting Tips
If your solar post caps aren’t working as expected, start by checking if they’re receiving enough sunlight during the day. Sometimes, nearby trees or structures can cast shadows that affect charging. Try cleaning the solar panel with a soft, damp cloth to remove any dust or debris that might be blocking sunlight absorption.
For caps that won’t turn on at night, ensure the power switch is in the “ON” position and verify that the battery pull tab has been completely removed during installation. If the lights still don’t work, try replacing the rechargeable batteries – they typically need replacement every 12-18 months.
Loose connections are another common issue. Make sure the cap fits snugly on your post. If it’s wobbling, use weather-resistant adhesive or small shims to create a secure fit. For caps that turn on during the day, the photosensor might be blocked or damaged. Clean around the sensor area or consider replacing the unit if the problem persists.
During winter months, you may notice reduced performance. This is normal due to shorter daylight hours and weaker sunlight. Regular cleaning and proper positioning will help maintain optimal performance year-round.
Maintenance and Care
Seasonal Care Tips
To keep your 6×6 solar light post caps performing optimally throughout the year, adjust your maintenance routine according to the seasons. In spring, start by gently cleaning the solar panels with a soft, damp cloth to remove any winter debris. Check for any damage from winter storms and ensure all components are securely fastened.
During summer, your solar lights will receive maximum sunlight, making it the perfect time to monitor their charging efficiency. Keep the panels clear of bird droppings, leaves, and pollen, which can reduce solar absorption. Consider trimming nearby foliage that might cast shadows on the panels.
Fall maintenance is crucial for preparing your lights for winter. Clear fallen leaves regularly and check that water isn’t collecting around the caps. This is also an ideal time to clean the light fixtures and inspect the seals to prevent moisture damage during wet weather.
In winter, snow and ice can significantly impact performance. Gently brush off snow accumulation from the solar panels, but avoid using sharp tools that might scratch the surface. If you live in an area with heavy snowfall, you might notice reduced lighting duration due to shorter daylight hours and weather interference.
For year-round care, regularly check that the light sensors aren’t obstructed and that all screws remain tight. If you notice any reduction in performance, clean the panels and check for loose connections before considering replacement.
Cleaning and Upkeep
Keeping your solar post caps clean and well-maintained ensures optimal performance and extends their lifespan. A simple monthly cleaning routine can make a significant difference in light output and overall efficiency.
Start by gently wiping the solar panel with a soft, damp cloth to remove dust, pollen, and bird droppings. Avoid using harsh chemicals or abrasive materials that could scratch the panel surface. For stubborn dirt, use a mild soap solution and rinse thoroughly with clean water.
Check the LED fixtures and housing for any debris or spider webs that might block the light. A soft brush can help remove these without damaging the components. During winter months, prevent snow accumulation on the solar panels by carefully brushing it off with a soft-bristled broom.
Inspect the post caps seasonally for any signs of water damage, loose parts, or deteriorating seals. Tighten any loose screws and replace damaged seals promptly to prevent moisture from affecting the internal electronics. If you notice condensation inside the light fixture, check the waterproof seals and consider replacing them.
To maximize battery life, allow the solar panels to receive full sunlight whenever possible. Trim back any overhanging branches or vegetation that might cast shadows on the panels. During extended periods of minimal sunlight, consider switching the lights to a lower brightness setting to conserve battery power.
By following these simple maintenance steps, your solar post caps will continue to provide reliable, eco-friendly lighting for years to come.
As we’ve explored throughout this guide, 6×6 solar light post caps represent more than just decorative lighting – they’re a testament to sustainable living and smart home design. These innovative fixtures combine functionality with environmental responsibility, offering reliable illumination while harnessing clean, renewable energy from the sun.
By choosing solar post caps, you’re not only enhancing your property’s aesthetic appeal but also contributing to a greener future. The benefits are clear: zero electricity costs, minimal maintenance requirements, and automatic operation that provides worry-free lighting year after year. The advanced LED technology and improved solar panels in modern designs ensure consistent performance, even during cloudy days and winter months.
Remember that proper installation and regular cleaning are key to maximizing your solar caps’ lifespan and performance. The initial investment in quality solar post caps pays off through years of reliable service and eliminated utility costs.
As more homeowners embrace sustainable solutions, solar post caps stand as a shining example of how small changes can make a significant impact. Whether you’re upgrading your deck, enhancing your garden, or improving your commercial property, solar post caps offer an eco-friendly lighting solution that aligns with both environmental consciousness and practical needs.
Take the step toward sustainable outdoor lighting today – your property, wallet, and the planet will thank you for it.


