
Build Your Perfect Off-Grid Solar System (With Complete Diagram)
Visualize your path to off-grid solar power independence with a comprehensive system diagram that maps every critical component and connection. Understanding the intricate relationship between solar panels, charge controllers, batteries, and inverters becomes crystal clear when you can see how each piece fits into the larger puzzle. Whether you’re planning a modest cabin setup or a full-scale homestead system, a well-designed diagram serves as your blueprint for success, helping you avoid costly mistakes and ensure optimal performance.
Modern off-grid solar installations combine time-tested principles with cutting-edge technology, making proper component selection and system integration more crucial than ever. By following a detailed diagram, you’ll confidently navigate the installation process, from positioning your solar panels for maximum sun exposure to securing the perfect battery bank size for your energy needs. This visual guide will empower you to create a reliable, efficient system that delivers sustainable power year-round.
Let’s explore how each component works together to create a seamless power generation and storage solution that can free you from the traditional grid while maintaining all the comforts of modern living.
Essential Components of an Off-Grid Solar System
Solar Panels and Array Configuration
Solar panels are the heart of your off-grid system, converting sunlight into usable electricity. Most residential installations use monocrystalline or polycrystalline panels, with monocrystalline offering higher efficiency in a smaller footprint. When planning your array, consider both your daily energy needs and available mounting space.
For optimal performance, panels should face true south (in the Northern Hemisphere) and be tilted at an angle roughly equal to your latitude. Ground mounts offer easy maintenance access and optimal positioning, while roof mounts save space but require careful structural consideration.
The configuration of your panels depends on your system voltage and power requirements. Panels can be wired in series to increase voltage or parallel to increase current. A typical off-grid home might use 8-12 panels arranged in two parallel strings of 4-6 panels each. This setup provides balanced performance and redundancy.
Remember to factor in some extra capacity – about 20% more than your calculated needs – to account for reduced efficiency on cloudy days and seasonal variations. Quality mounting hardware and proper spacing between panels for ventilation are equally important for long-term reliability.

Battery Bank and Storage Solutions
Battery storage is the heart of any off-grid solar system, serving as your energy reservoir when the sun isn’t shining. Most modern installations use lithium-ion batteries, though some still opt for traditional deep-cycle lead-acid batteries. Each type has its advantages – lithium batteries offer longer life and better efficiency, while lead-acid batteries are more budget-friendly.
To calculate your battery bank capacity, start by listing your daily power needs in kilowatt-hours (kWh). A typical home might use 20-30 kWh per day. Add 20% to account for efficiency losses, then multiply by the number of days you want for backup power. For example, if you need 25 kWh daily and want three days of autonomy, aim for a 90 kWh battery bank.
Regular maintenance keeps your batteries performing optimally. For lithium batteries, this mainly involves monitoring temperature and charge levels. Lead-acid batteries require more attention – check water levels monthly, clean terminals regularly, and ensure proper ventilation in the storage area.
Remember to install your batteries in a temperature-controlled space, as extreme temperatures can significantly impact their performance and lifespan. Consider using a battery monitoring system to track performance and prevent over-discharge.
Charge Controllers and Inverters
Charge controllers and inverters are the brains of your off-grid solar system, working together to manage power flow and convert electricity into a usable form. The charge controller prevents your batteries from overcharging by regulating the voltage coming from your solar panels, much like a traffic officer directing energy flow. It also stops reverse current flow at night, protecting your system’s components.
The inverter transforms the DC power stored in your batteries into AC power that your household appliances can use. Think of it as a translator, converting solar-speak into appliance-language. Most home inverters provide standard 120V AC power, just like your regular wall outlets. For optimal performance, choose an inverter sized appropriately for your power needs, typically ranging from 2,000 to 8,000 watts for residential systems.
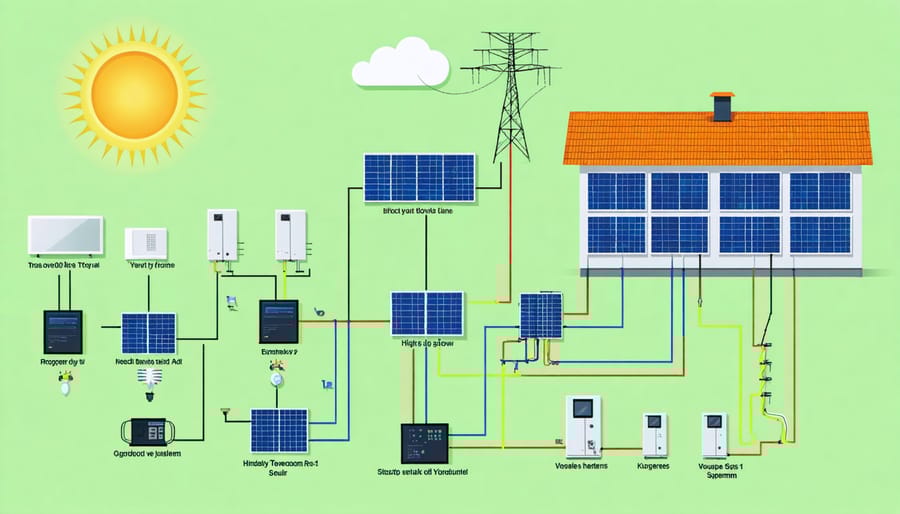
Understanding the System Diagram
Power Flow and Wiring Basics
The power flow in an off-grid solar system follows a logical path that’s essential to understand before wiring your solar system. Starting from your solar panels, sunlight is converted into DC electricity, which travels through MC4 connectors to your charge controller. Think of the charge controller as a traffic officer, directing power where it needs to go.
From there, the electricity takes one of two paths: it either flows to your batteries for storage or heads to your inverter for immediate use. When power flows to the batteries, it’s stored as DC electricity until needed. When your home requires power, the DC electricity from either the panels or batteries flows to the inverter, which transforms it into AC electricity – the type your household appliances use.
The system includes several safety components, like circuit breakers and fuses, positioned at critical junction points. These act as guardians, protecting your equipment from power surges and short circuits. Ground wires connect all metal components, creating a safe path for any stray electricity.
Remember, electricity always seeks the path of least resistance, so proper cable sizing and secure connections are crucial for efficient power flow. This ensures you get the most from your solar investment while maintaining safety.
Safety Components and Protection Devices
Safety components are crucial elements that protect both your off-grid solar system and your home. At the heart of these protective measures are circuit breakers, which act like automatic switches that cut power when they detect dangerous electrical surges. Think of them as vigilant guardians that prevent system damage and potential fire hazards.
Fuses serve as an additional safety net, designed to melt and break the circuit if too much current flows through them. We recommend installing fuses at multiple points in your system, particularly between the solar panels and charge controller, and between the batteries and inverter.
A robust grounding system is equally important – it provides a safe path for electrical currents in case of lightning strikes or system malfunctions. This involves connecting all metal components to ground rods driven deep into the earth. Make sure to use proper gauge grounding wire and weather-resistant connections.
Don’t forget surge protectors, which shield your sensitive electronics from voltage spikes. Install them on both the DC and AC sides of your system. For battery protection, temperature sensors and battery monitors help prevent overcharging and deep discharging.
Remember to regularly inspect these safety components for signs of wear or damage. A monthly visual check of all connections, fuses, and breakers can help catch potential issues before they become problems. When in doubt, always consult a qualified electrician for safety component installation or replacement.
Monitoring and Control Systems
Modern off-grid solar systems come equipped with sophisticated monitoring and control systems that act as your system’s dashboard. These smart components help you track energy production, battery status, and overall system performance in real-time.
The heart of your monitoring setup is typically a charge controller display or a dedicated monitoring device that shows essential information like battery voltage, charging current, and power consumption. Many contemporary systems also include smartphone apps that let you check your system’s status from anywhere.
Key monitoring features to look for include:
– Real-time power generation metrics
– Battery state of charge and health
– Load consumption patterns
– System alerts and notifications
– Historical performance data
The control interface allows you to manage power distribution, set charging parameters, and configure system preferences. Some advanced systems even incorporate automated load management, which can turn off non-essential appliances when battery levels are low.
For enhanced reliability, consider installing sensors that monitor environmental conditions like temperature and humidity. These help protect your investment by alerting you to potential issues before they become problems.
Remote monitoring capabilities are particularly valuable for properties that aren’t continuously occupied. They provide peace of mind by letting you check system status and receive alerts about any issues that need attention, even when you’re away from your property.
Remember to regularly review your monitoring data to optimize system performance and identify any maintenance needs early on.
Sizing Your System Components
Load Calculation Methods
Before designing your off-grid solar system, accurately calculating your power needs is essential for long-term success. Start by creating a detailed list of all electrical appliances and devices you plan to power. For each item, locate the wattage rating, typically found on a label or in the user manual.
Next, estimate the daily usage hours for each device. Multiply the wattage by the hours of use to determine daily watt-hours (Wh). For example, a 60-watt light bulb used for 5 hours consumes 300 Wh per day. Add up all your daily watt-hours to find your total daily energy requirement.
Don’t forget to account for seasonal variations. Winter months typically require more lighting hours, while summer might need additional cooling power. It’s wise to add a 20% buffer to your calculations to accommodate unexpected usage and system inefficiencies.
Here’s a simple calculation method:
1. Device wattage × Hours of use = Daily watt-hours
2. Sum up all daily watt-hours
3. Add 20% safety margin
4. Convert to kilowatt-hours (divide by 1000)
Remember to consider energy-intensive appliances like refrigerators, water pumps, and HVAC systems separately, as they cycle on and off throughout the day. For these, use their average daily consumption rather than peak wattage.
Pro tip: Monitor your current utility bills for a few months to get a realistic picture of your energy consumption patterns. This data can help validate your calculations and ensure your off-grid system meets your actual needs.
Component Sizing Guidelines
Achieving a reliable solar system design starts with proper component sizing. To determine your solar panel array size, multiply your daily energy consumption (in watt-hours) by 1.3 to account for system losses, then divide by the average peak sun hours in your location.
For battery bank sizing, calculate your required storage capacity using this formula:
(Daily Energy Use × Days of Autonomy) ÷ (Battery Depth of Discharge × System Voltage)
Your charge controller should be sized to handle the maximum current from your solar array. To calculate this, divide your total solar array wattage by the system voltage, then add 25% for safety margin.
The inverter size should exceed your highest expected simultaneous power draw by at least 20%. Add up the wattage of all appliances you might use at once, then multiply by 1.2 for a safe buffer.
For wiring, use this quick reference:
– 0-20 feet: 10 AWG wire
– 21-40 feet: 8 AWG wire
– 41-60 feet: 6 AWG wire
– 61-100 feet: 4 AWG wire
Remember to factor in temperature variations, elevation, and local climate conditions when sizing components. In colder climates, increase battery capacity by 10-15%. For high-altitude installations, decrease inverter capacity ratings by 2% for every 1,000 feet above sea level.
Always consult local regulations and professional installers for final sizing verification, as these guidelines provide a starting point for system design.
Installation Tips and Best Practices
When implementing your off-grid solar system, success lies in the details. Start by ensuring your mounting location receives maximum sunlight exposure throughout the day. For optimal performance, solar panels should face true south (in the Northern Hemisphere) with a tilt angle matching your latitude. Learn more about specific off-grid living installation tips to maximize your system’s efficiency.
Keep all battery banks in a well-ventilated, temperature-controlled space to extend their lifespan. Mount your inverter close to the batteries to minimize voltage drop, but ensure it’s easily accessible for maintenance. When running cables, use appropriate sizing to prevent power loss and maintain proper spacing to avoid interference.
Weather-proof all outdoor connections using appropriate junction boxes and conduit. Label all components and cables clearly for easy troubleshooting and maintenance. Consider installing monitoring systems to track performance and identify potential issues early.
Remember to follow local building codes and obtain necessary permits before installation. While DIY installation is possible, working with a certified installer is recommended for complex systems. Regular maintenance checks, including cleaning panels and checking connections, will ensure your system operates at peak efficiency for years to come.
Finally, document your installation process and keep detailed records of component specifications for future reference or system upgrades.
Going off-grid with solar power is an exciting and rewarding journey that puts you in control of your energy future. As we’ve explored throughout this guide, understanding your system’s components and their connections is crucial for a successful installation. Remember that proper planning, including accurate sizing calculations and careful component selection, will ensure your system meets your energy needs effectively. Whether you’re a homeowner looking to reduce your carbon footprint or a property manager seeking energy independence, the path to solar self-sufficiency is clearer than ever. Start small if needed, but don’t hesitate to take that first step toward energy independence. With the right diagram as your blueprint and a solid understanding of system basics, you’re well-equipped to begin your off-grid solar adventure. The future of sustainable living awaits!


