
Build Your Own 5kW Solar System: A Money-Saving DIY Project
Transform your home into a self-sustaining power hub with a DIY 5kW solar system – a project that can slash your electricity bills by 60-80% while paying for itself within 4-6 years. Master the complete installation process from component selection to final setup, even without prior solar experience.
This comprehensive guide walks you through designing and installing a system that powers an average 3-4 bedroom home, requiring approximately 15-20 solar panels across 400 square feet of roof space. Learn essential safety protocols, navigate local building codes, and select optimal components while saving $6,000-$8,000 in professional installation costs.
Whether you’re a seasoned DIY enthusiast or taking on your first major home improvement project, this step-by-step tutorial breaks down complex technical concepts into manageable tasks. Discover how to properly size your system, choose compatible components, and ensure your installation meets all safety and regulatory requirements for maximum efficiency and longevity.
Planning Your 5kW Solar System

System Components and Cost Breakdown
Here’s a comprehensive breakdown of the main components you’ll need for a 5kW solar system, along with their typical cost ranges:
Solar Panels (20 x 250W panels): $3,000 – $4,000
These form the heart of your system, converting sunlight into electricity. Look for panels with efficiency ratings above 15% and solid warranty coverage.
Inverter: $1,200 – $1,800
A quality string inverter or multiple micro-inverters to convert DC power to AC power for home use. Consider brands like SolarEdge or Enphase for reliability.
Mounting System: $600 – $800
Including rails, clamps, and roof attachments. Ensure materials are aluminum or stainless steel for durability.
Electrical Components: $400 – $600
– MC4 connectors
– Solar cables
– Circuit breakers
– Junction boxes
– Conduit and fittings
Battery Storage (Optional): $4,000 – $6,000
While not mandatory, adding battery storage allows for energy use during non-sunny periods.
Monitoring System: $150 – $300
To track your system’s performance and energy production.
Tools and Safety Equipment: $200 – $400
Including voltage testers, wire strippers, and personal protective equipment.
Total DIY Cost Range: $5,550 – $7,900 (without battery)
Professional installation typically adds $3,000 – $5,000 to these costs, making DIY an attractive option for hands-on homeowners.
Site Assessment and Energy Requirements
Before diving into your 5kW solar system installation, proper site assessment and energy calculation are crucial first steps. Start by evaluating your roof’s orientation – south-facing surfaces in the Northern Hemisphere receive the most sunlight throughout the day. Check for any shading from trees, buildings, or other obstructions that could reduce your system’s efficiency.
Measure your available roof space, keeping in mind that a 5kW system typically requires about 300-400 square feet of unobstructed area. Assess your roof’s condition and structural integrity; it should be in good shape and able to support the additional weight of solar panels and mounting equipment.
To calculate your energy requirements, review your past 12 months of electricity bills. Look for your average monthly consumption in kilowatt-hours (kWh). A 5kW solar system generally produces between 350-850 kWh per month, depending on your location’s solar irradiance and climate conditions.
Use an online solar calculator to estimate your specific energy production potential based on your geographic location. Consider seasonal variations in sunlight and energy consumption patterns. Also, factor in any planned increases in electricity usage, such as adding an electric vehicle or new appliances.
Remember to check local building codes, HOA restrictions, and permit requirements before proceeding with installation. This preliminary assessment will help ensure your DIY solar project meets your energy needs and complies with local regulations.

Tools and Safety Equipment
Before starting your DIY solar installation journey, gathering the right tools and safety equipment is crucial. Here’s your comprehensive checklist to ensure a safe and successful installation:
Essential Tools:
– Cordless drill with various drill bits
– Wire strippers and crimpers
– Digital multimeter
– Socket set and adjustable wrenches
– Level (both standard and digital)
– Measuring tape and marking tools
– Cable ties and conduit
– Ladder or scaffold system
– Power saw (for roof mounting modifications)
– Solar panel cleaning kit
Safety Equipment:
– Full-body safety harness with lanyard
– Non-slip safety boots
– Hard hat with chin strap
– Safety glasses with UV protection
– Work gloves (both electrical and heavy-duty)
– Long-sleeve UV-protective clothing
– Sunscreen and protective hat
– Dust mask or respirator
– First aid kit
– Fire extinguisher (rated for electrical fires)
Electrical Safety Tools:
– Voltage tester
– Insulated tools
– Rubber insulating gloves
– Electrical tape
– Circuit testing equipment
– Ground fault circuit interrupter (GFCI)
Remember to inspect all tools before use and replace any damaged equipment immediately. When working on the roof, always have a spotter on the ground and ensure your ladder is properly secured. Keep your tools organized in a toolbox or belt for easy access and to prevent dropping hazards.
For electrical work, use only tools rated for the voltage you’re working with. Never compromise on safety equipment quality – investing in proper gear is far less expensive than dealing with potential accidents or injuries. Store all equipment in a dry, secure location when not in use, and maintain a clean, organized workspace throughout your installation project.
Step-by-Step Installation Process
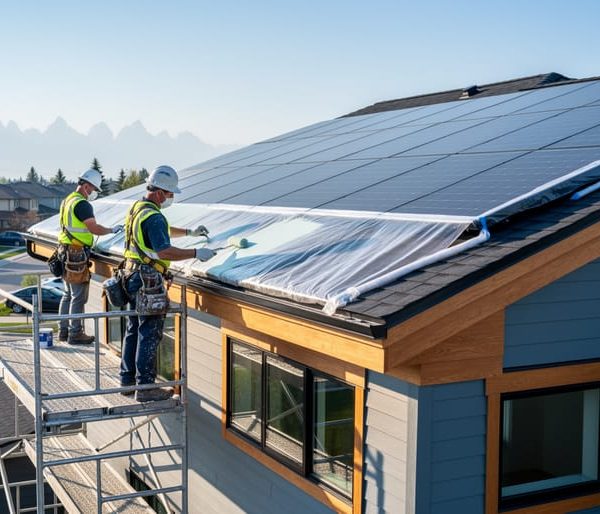
Mounting System Installation
Before installing your solar panels, you’ll need to set up a secure mounting system on your roof. Start by inspecting your roof’s condition and identifying the rafters – these will be your primary attachment points. Using a stud finder and chalk line, mark the rafter locations clearly on your roof.
Begin by installing flashing at each mount location to prevent water penetration. Drill pilot holes through your roofing material and into the rafters, being careful to center each hole precisely. Apply roofing sealant around each hole before securing the lag bolts and mounting brackets. Ensure each mount is level and properly torqued to manufacturer specifications.
Next, assemble the racking rails according to your system design. Most residential installations use two parallel rails per row of panels. Connect the rails to your roof mounts using the provided hardware, making sure they’re perfectly aligned and level. Use a string line to verify straightness across the entire array.
Install any necessary mid-clamps and end-clamps onto the rails – these will hold your panels in place. Leave these slightly loose until panel placement. For added stability, install cross-bracing between rails if recommended by your racking system manufacturer.
Remember to maintain proper spacing between rows for ventilation and maintenance access. A good rule of thumb is leaving 3-4 inches between panel rows. Double-check all connections and ensure every component is secure before moving on to panel installation.
Pro tip: Take photos of your mounting system installation before adding panels. This documentation can be helpful for future maintenance or system modifications.

Solar Panel Placement
Proper panel placement is crucial for maximizing your 5kW solar system’s efficiency. Start by identifying the optimal roof section that receives the most sunlight throughout the day. In the Northern Hemisphere, south-facing roof sections typically offer the best exposure, while north-facing sections work better for Southern Hemisphere installations.
Aim for a roof angle between 30-45 degrees for optimal energy production. If your roof pitch differs significantly, you can use mounting brackets to adjust the panel angle. Ensure there’s no shade from nearby trees, chimneys, or other structures during peak sunlight hours (10 AM to 4 PM).
When laying out your panels, maintain a minimum gap of 1-2 inches between each panel for thermal expansion and airflow. This spacing also makes maintenance easier. A typical 5kW system usually requires 15-20 panels, depending on their individual wattage ratings.
For the electrical connection, arrange your panels in strings. Each string should contain panels with matching specifications to prevent power loss from mismatched voltages. Most 5kW systems work best with 2-3 parallel strings of 5-7 panels each.
Pro tip: Before mounting, create a detailed layout plan on paper. Mark your roof’s structural supports (rafters or trusses) as these will be your anchor points. Use a chalk line to ensure straight panel rows and maintain consistent spacing. Remember to leave adequate paths for maintenance access and keep at least 3 feet clear of roof edges for safety and building code compliance.
Always double-check your local building codes and obtain necessary permits before starting the installation. If you’re unsure about any aspect of panel placement, consult with a professional solar installer.

Electrical Wiring and Inverter Setup
The electrical wiring and inverter setup is a crucial phase that requires careful attention to detail and safety considerations. Before beginning the solar panel wiring, ensure you have all necessary components, including MC4 connectors, proper gauge DC cables, and grounding equipment.
Start by connecting your solar panels in series or parallel configuration, depending on your inverter’s specifications. For a 5kW system, you’ll typically wire 2-3 strings of panels in parallel to achieve the desired voltage. Always double-check polarity to prevent reverse current flow.
Your inverter should be mounted in a cool, dry location, preferably near your main electrical panel. Install a DC disconnect switch between the solar array and inverter for safety during maintenance. The AC output from the inverter must connect to your home’s electrical panel through an appropriate circuit breaker.
Remember to include proper grounding throughout the system. All metal components, including panel frames and mounting rails, should be connected to a continuous grounding conductor leading to your home’s grounding electrode system.
For the monitoring setup, connect your inverter to your home’s internet network using either Wi-Fi or ethernet cable. This allows you to track system performance through the manufacturer’s monitoring platform.
Before making final connections, have a licensed electrician inspect your work to ensure compliance with local electrical codes. They can also help with the final grid connection and system commissioning. While DIY installation can save money, proper electrical safety cannot be compromised.
System Testing and Grid Connection
Before connecting your 5kW solar system to the grid, thorough testing is essential to ensure safe and efficient operation. Start by conducting a visual inspection of all connections, making sure every component is properly secured and weatherproofed. Using a multimeter, test the voltage output from your solar panels and verify it matches the expected specifications.
Next, perform inverter testing by checking its display for any error codes and confirming it’s producing the correct AC output. Many modern inverters come with smartphone apps that can help monitor system performance and identify potential issues. Remember to test all safety mechanisms, including emergency shutoffs and ground fault protection devices.
The final step involves coordinating with your utility company for the grid connection setup. They’ll need to install a bi-directional meter and verify your system meets local codes. During this process, a certified electrician should perform an anti-islanding test to ensure your system automatically shuts down during power outages, protecting utility workers.
Document all test results and keep them with your system records. Many jurisdictions require this documentation for warranty purposes and future inspections. Once connected, monitor your system’s performance daily for the first week to ensure everything operates as expected. Modern monitoring systems can alert you to any performance issues, helping you maintain optimal energy production throughout your system’s lifetime.
Remember, while DIY installation can save money, having a professional review your work before grid connection adds an extra layer of safety and peace of mind.
Permits and Regulations
Before starting your DIY solar installation journey, it’s crucial to understand and comply with local permits and regulations. Most jurisdictions require specific permits for solar installations, even for residential DIY projects. Start by contacting your local building department to learn about the requirements in your area.
Typically, you’ll need to obtain an electrical permit and a building or structural permit. These ensure your installation meets safety standards and building codes. Many areas also require a plan review, where you’ll submit detailed drawings of your proposed system layout and electrical connections.
Your local utility company is another important point of contact. They’ll need to approve your system’s connection to the grid and may require additional documentation or inspections. Most utilities have specific requirements for disconnect switches and metering equipment that you must follow.
Some homeowners’ associations (HOAs) have restrictions on solar installations, so check your HOA bylaws if applicable. While many states have “solar rights” laws that limit HOA restrictions, it’s better to address any concerns before starting your project.
Don’t forget to research available solar installation incentives and ensure your DIY installation qualifies. Some rebate programs require professional installation, while others accept DIY projects with proper permits and inspections.
Remember that permits aren’t just red tape – they protect you and your property. A properly permitted installation ensures insurance coverage and helps maintain your home’s value. Most jurisdictions require at least one inspection during installation and a final inspection before system activation.
Keep detailed records of all permits, approvals, and inspection certificates. These documents will be valuable when selling your home or applying for incentives. While the permitting process might seem daunting, it’s a necessary step in creating a safe and legal solar installation.
Maintenance and Troubleshooting
Regular maintenance is crucial for keeping your 5kW solar system running efficiently. Maintaining your solar panels properly can extend their lifespan and maximize energy production. Here’s what you need to do:
Clean your panels every 3-4 months using soft water and a gentle brush. Avoid harsh chemicals or abrasive materials that could scratch the surface. Check for debris, leaves, or bird droppings that might block sunlight.
Monitor your system’s performance through your inverter display or monitoring app. A sudden drop in energy production could indicate an issue that needs attention. Inspect wiring connections quarterly for signs of wear, looseness, or damage.
Common troubleshooting tips:
– If production drops, first check for panel shading or dirt
– When inverter shows error codes, document them and consult your manual
– For unexplained system shutdowns, check your circuit breakers
– If monitoring system isn’t responding, verify your internet connection
Keep a maintenance log and take photos of any visible issues. For electrical problems or complex repairs, always contact a certified solar technician. Regular inspection of mounting hardware and roof penetrations can prevent water damage and ensure system stability.
Remember to check your batteries (if installed) for proper water levels and terminal corrosion every six months. This simple maintenance routine will help ensure years of reliable solar power generation.
Installing a 5kW solar system yourself is an achievable goal that can lead to significant energy savings and environmental benefits. By following proper safety guidelines, securing necessary permits, and carefully planning each step, you can successfully complete this rewarding project. Remember to consult local regulations, work with certified electricians when required, and maintain your system regularly for optimal performance. Whether you’re looking to reduce your carbon footprint or save on energy bills, a DIY solar installation empowers you to take control of your energy future. With the right tools, knowledge, and determination, you’re well-equipped to join the growing community of homeowners embracing clean, renewable energy through solar power.


