
Build Your Own Solar-Powered Water Purifier: A DIY Solution for Clean Water
Transform your access to clean water with a DIY solar desalination kit – a breakthrough solution that harnesses sunlight to convert seawater or brackish water into pure, drinkable water. This innovative technology for solar-powered water purification at home combines simple physics with sustainable energy, producing up to 3 gallons of fresh water daily using nothing but solar power.
Unlike traditional water purification systems that rely on expensive filters or chemicals, solar desalination kits operate completely off-grid, requiring only sunlight and basic maintenance. The system uses a transparent cover to capture solar energy, heating and evaporating saltwater while leaving behind contaminants, minerals, and salt. As the pure water vapor condenses, it’s collected and stored for drinking, cooking, or irrigation.
Perfect for coastal homeowners, disaster preparedness, or sustainable living enthusiasts, these kits offer a reliable, eco-friendly solution to water scarcity. With minimal setup and operating costs, they provide long-term water security while reducing dependence on municipal water supplies.
How Solar Desalination Works
The Science Behind Solar Purification
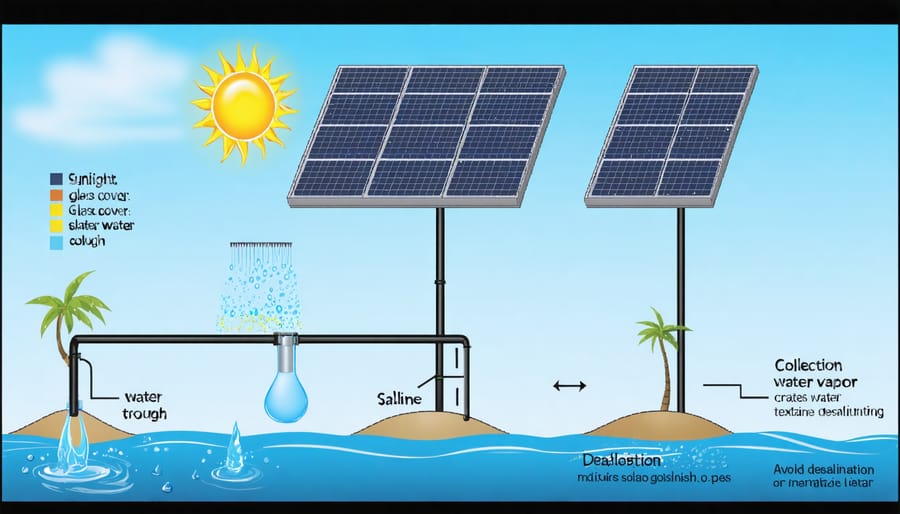
Solar desalination works through a fascinating natural process that’s similar to how rain forms in our environment. While large-scale desalination technologies use complex systems, the basic science behind solar purification is surprisingly simple.
When sunlight hits the water in your solar still, it causes the water molecules to heat up and transform into vapor, leaving behind salt, minerals, and contaminants. This vapor rises naturally, just like clouds in the sky. As the vapor reaches the cooler glass or plastic surface of your solar still, it condenses back into water droplets – pure, clean water that’s free from impurities.
Think of it as nature’s filtering system: only pure water molecules can evaporate, while heavier substances stay behind. The condensed water then trickles down the angled surface into collection channels, ready for use. This process mirrors Earth’s natural water cycle but happens in a controlled environment that you can set up in your backyard.
Key Components of a Solar Desalination Kit
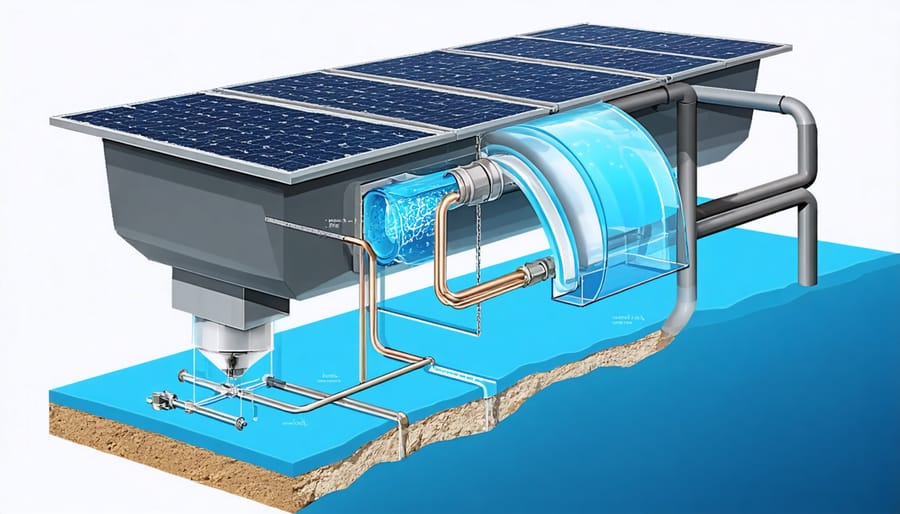
A basic solar desalination kit consists of several essential components that work together to purify water using solar energy. The heart of the system is the solar collector, typically a dark-colored basin or tray that absorbs sunlight and heats the water. Above this sits a clear glass or plastic cover, sloped at an angle to allow condensed water to flow downward.
The collection trough, positioned at the lower edge of the sloped cover, catches and channels the purified water into a storage container. A rubber or silicone seal between the cover and basin prevents vapor from escaping, ensuring maximum efficiency. The contaminated water inlet allows for easy filling, while the drainage valve helps remove concentrated brine after the process.
Additional components may include a water level indicator, temperature gauge, and UV-resistant materials for durability. For enhanced performance, some kits feature reflective panels that direct more sunlight onto the collector surface. Many DIY enthusiasts also add insulation around the basin to minimize heat loss and improve efficiency.
Remember, while individual components may vary between different kit designs, these core elements are essential for successful solar desalination.
Building Your Solar Desalination Kit
Required Materials and Tools
To build your solar desalination kit, you’ll need the following materials and tools:
Essential Materials:
– Large clear glass or plastic cover (minimum 2×2 feet)
– Black-painted metal or plastic container for saltwater
– Food-grade silicone sealant
– Collection trough or container
– Flexible tubing (food-grade)
– Dark-colored absorber material (like black fabric or carbon)
– Reflective material (aluminum foil or mirror finish metal)
– Weather-resistant frame materials (wood or aluminum)
– Stainless steel or plastic fasteners
– UV-resistant plastic sheet (as a backup cover)
Required Tools:
– Drill with various bit sizes
– Screwdriver set
– Utility knife
– Measuring tape
– Level
– Pencil or marker
– Safety equipment (gloves, safety glasses)
– Caulking gun
– Basic wrench set
– Scissors
Optional but Recommended:
– Temperature gauge
– Water quality testing kit
– pH meter
– Silicon grease for maintenance
– Cleaning supplies
– Small water pump (if automation desired)
Remember to choose high-quality, food-safe materials as they’ll be in contact with your drinking water. All components should be weather-resistant to ensure longevity.
Assembly Instructions
Let’s get your solar desalination kit up and running with these straightforward steps. First, lay out all your components on a clean, flat surface: the solar collector panel, condensation chamber, water inlet pipe, collection container, and mounting brackets.
Begin by assembling the solar collector frame. Attach the mounting brackets to each corner, ensuring they’re securely fastened. Position the solar-absorbing surface within the frame, making sure it’s properly aligned with the pre-drilled holes. Secure it using the provided screws, but don’t overtighten.
Next, connect the condensation chamber to the solar collector. This is where the magic happens! Carefully align the chamber’s inlet port with the collector’s outlet. Use food-grade silicone sealant around the connection points to prevent any vapor leakage. Allow the sealant to cure for at least 24 hours.
Install the water inlet system by connecting the feed pipe to the marked inlet port. Double-check that all fittings are watertight. Attach the collection container at the bottom of the condensation chamber, ensuring it’s properly sealed to capture all purified water.
For optimal performance, mount the entire system at a 15-30 degree angle, facing south if you’re in the Northern Hemisphere. Use a level to ensure proper alignment. The angle helps with water flow and maximizes sun exposure.
Finally, connect the optional monitoring system if included in your kit. This helps track water production and system efficiency.
Before first use, run a system test with a small amount of water to check for leaks. Once confirmed leak-free, flush the system with clean water for 10 minutes to remove any manufacturing residue.
Remember to place your kit in an unshaded area and clean the solar collector surface regularly for maximum efficiency. With proper assembly and maintenance, your solar desalination system will provide clean water for years to come.
Safety Considerations
When working with a solar desalination kit, safety should always be your top priority. Start by wearing appropriate protective gear, including UV-resistant safety glasses and heat-resistant gloves, as the system can get quite hot during operation. Ensure your installation area is stable and away from high-traffic zones to prevent accidental bumps or spills.
Keep children and pets away from the system while it’s operating, as the water can reach high temperatures. Always use food-grade materials for components that come into contact with the water to prevent contamination. Regular maintenance checks are essential – inspect seals, connections, and solar panels for any damage or wear.
Be cautious when handling the concentrated brine produced during desalination, as it can be corrosive. Dispose of it properly according to local regulations. During setup and maintenance, avoid working alone in case of emergencies. Keep a first aid kit nearby, and ensure you have emergency contact numbers readily available.
Monitor weather conditions and secure your system during strong winds or storms. Finally, never drink untested water – always verify the quality of your desalinated water before consumption.
Maximizing Your Kit’s Efficiency

Positioning and Maintenance
Proper positioning of your solar desalination kit is crucial for maximizing solar energy efficiency and ensuring long-term performance. Place your kit in a location that receives direct sunlight for at least 6-8 hours daily, ideally facing south if you’re in the Northern Hemisphere. Avoid areas with overhead obstacles like trees or buildings that could cast shadows on the system.
For optimal performance, adjust the angle of your solar collectors seasonally: steeper in winter (around 60 degrees) and flatter in summer (around 30 degrees). This simple adjustment can significantly boost your water production throughout the year.
Regular maintenance is straightforward but essential. Clean the glass surface of your solar collectors weekly using distilled water and a soft cloth to remove dust and debris. Check the water inlet and outlet pipes monthly for any blockages or mineral buildup. During the cleaning process, inspect seals and connections for signs of wear or damage.
In areas with hard water, descale the system every three months using a vinegar solution or an environmentally friendly descaling agent. Keep the surrounding area clear of vegetation and debris that might interfere with sunlight exposure or ventilation. Store extra replacement parts like seals and filters to ensure continuous operation when maintenance is needed.
Remember to winterize your system in cold climates by draining all water components and covering the collectors when not in use during freezing temperatures.
Troubleshooting Common Issues
Even the best-maintained solar desalination kits can sometimes encounter issues. Here are solutions to the most common problems you might face:
If you notice reduced water output, first check for mineral buildup on the glass cover. A simple vinegar solution can safely remove these deposits without damaging the system. Also ensure the water level in the basin is adequate – too little water will decrease efficiency.
When dealing with cloudy output water, verify that your collection trough is clean and properly positioned. Sometimes, a slight adjustment to the trough angle can prevent brine water from mixing with the purified water. Regular cleaning of the collection surface helps maintain water clarity.
For systems producing less steam than usual, inspect the solar absorber material for dust or debris. A gentle wipe with a soft, damp cloth usually restores performance. In areas with hard water, you might need to descale the basin monthly.
If you notice water leakage, check all seals and gaskets. UV exposure can degrade these components over time, but they’re easily replaceable. When condensation appears on the wrong surfaces, ensure proper ventilation and check that the glass cover maintains the correct angle.
For unexpectedly slow production rates, verify that your unit faces the optimal direction and isn’t shaded during peak hours. Sometimes, simply repositioning the kit can significantly improve performance.
Real User Success Stories
Meet Sarah Thompson from Arizona, who transformed her family’s access to clean water using a solar desalination kit. “Before installing our system, we relied heavily on bottled water due to our brackish well water,” Sarah explains. “Now we produce up to 5 gallons of fresh water daily, saving us nearly $100 monthly on bottled water while reducing plastic waste.”
In coastal California, the Martinez family installed their solar desalination system as part of their commitment to sustainable living. “We connected it to our rainwater collection system,” says Carlos Martinez. “During dry seasons, we can purify seawater from our beach trips, providing an emergency water source while teaching our kids about water security solutions.”
John Chen, a retired engineer in Florida, shares his experience: “I built my kit as a weekend project with my grandson. The initial setup cost us about $600, but it’s been running smoothly for two years now. We use the purified water for our greenhouse and emergency backup.”
Small business owner Maria Rodriguez implemented a larger-scale system at her beachside café. “We installed three units to purify seawater for our kitchen needs. Our customers love that we’re eco-friendly, and we’ve cut our water bills by 60%.”
Perhaps the most inspiring story comes from the Green Valley Community Garden in New Mexico. Coordinator Pete Williams reports, “Our solar desalination system helps us maintain our desert garden year-round. We’re now teaching other communities how to build their own systems. It’s amazing to see how one simple technology can bring people together while solving water scarcity issues.”
These success stories demonstrate how solar desalination kits are making a real difference in communities across America, providing sustainable water solutions while promoting environmental consciousness.
Building your own solar desalination kit is more than just a fascinating DIY project – it’s a step towards a more sustainable future. By harnessing the power of the sun to purify water, you’re not only reducing your environmental footprint but also gaining invaluable self-sufficiency skills. The benefits are clear: significant cost savings on water bills, a reliable source of clean water during emergencies, and the satisfaction of knowing you’re using renewable energy for this essential process.
Whether you’re a homeowner looking to decrease utility costs or an eco-conscious individual wanting to make a difference, a solar desalination system offers a practical solution. The initial investment in materials and time pays off through years of clean water production with minimal operating costs. Plus, the modular nature of these systems means you can start small and expand as needed.
Ready to begin your solar desalination journey? The materials are readily available, the construction process is straightforward, and the impact is immediate. Remember that every gallon of water you purify using solar energy represents a step away from energy-intensive conventional methods. By starting your project today, you’re not just building a water purification system – you’re investing in a cleaner, more sustainable future for yourself and generations to come.
Take that first step now, and join the growing community of solar desalination enthusiasts making a positive change in the world.


