Your Solar Yard Lights Stopped Working? Here’s Why (And How to Fix Them Tonight)
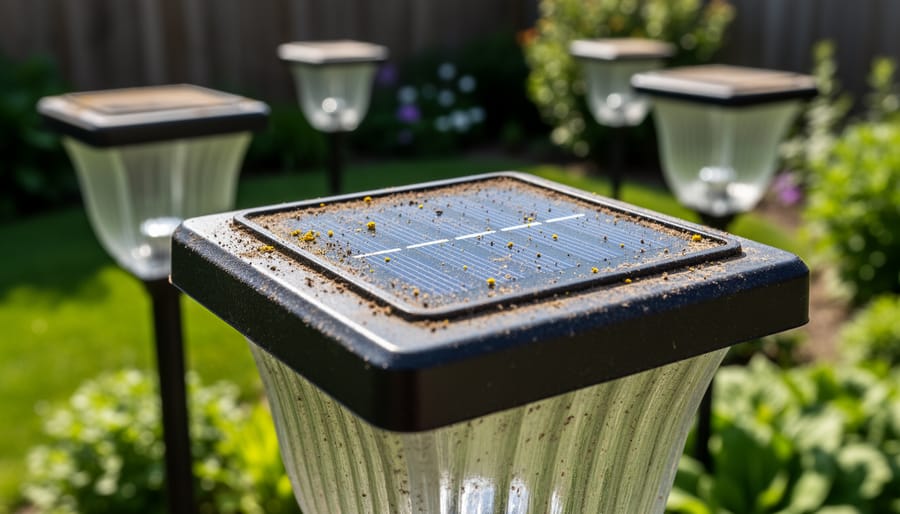
Check if your solar panels are dirty or covered by debris—grime blocks up to 80% of sunlight absorption. Wipe the panels with a soft, damp cloth and mild soap, then rinse thoroughly. Position lights where they receive at least 6-8 hours of direct sunlight daily, away from shadows cast by trees, buildings, or fences.
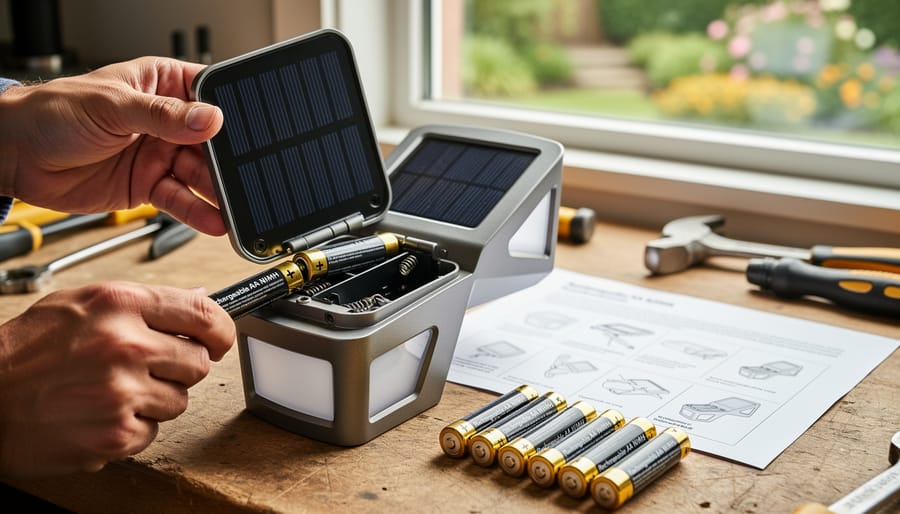
Replace rechargeable batteries if your lights are over two years old, as battery capacity degrades significantly after 300-500 charge cycles. Most solar lights use AA or AAA NiMH batteries available at hardware stores. Open the battery compartment, note the battery type and voltage, and swap in fresh replacements.
Toggle the on/off switch several times to break through corrosion buildup on contacts. Inspect wire connections inside the light fixture for looseness or rust—tighten any disconnected wires and clean corroded terminals with white vinegar on a cotton swab. These simple DIY solar light repairs resolve most common failures without requiring technical expertise or special tools.
Test your lights by covering the solar panel with your hand in a dark room—properly functioning lights should illuminate within seconds. If they don’t respond after cleaning panels, replacing batteries, and checking connections, the photoresistor or LED may need replacement, which requires slightly more advanced troubleshooting but remains completely manageable for most homeowners committed to extending their solar investment’s lifespan.
Why Solar Yard Lights Stop Working (The Most Common Culprits)
You’re not alone if your solar yard lights have suddenly gone dark. The good news? Most solar light failures stem from a handful of easily fixable issues, and understanding these common culprits is the first step toward getting your outdoor lighting back on track.
The primary reason solar lights stop working is battery failure. Just like the batteries in your TV remote, solar light batteries have a limited lifespan, typically lasting between one to three years depending on usage and quality. Over time, these rechargeable batteries lose their ability to hold a charge, even when the solar panel is working perfectly.
Dirty or obstructed solar panels rank as the second most common issue. Think of it this way: if your solar panel is covered in dust, pollen, leaves, or bird droppings, it’s like trying to charge your phone through a thick blanket. The panel simply can’t absorb enough sunlight to power your lights effectively.
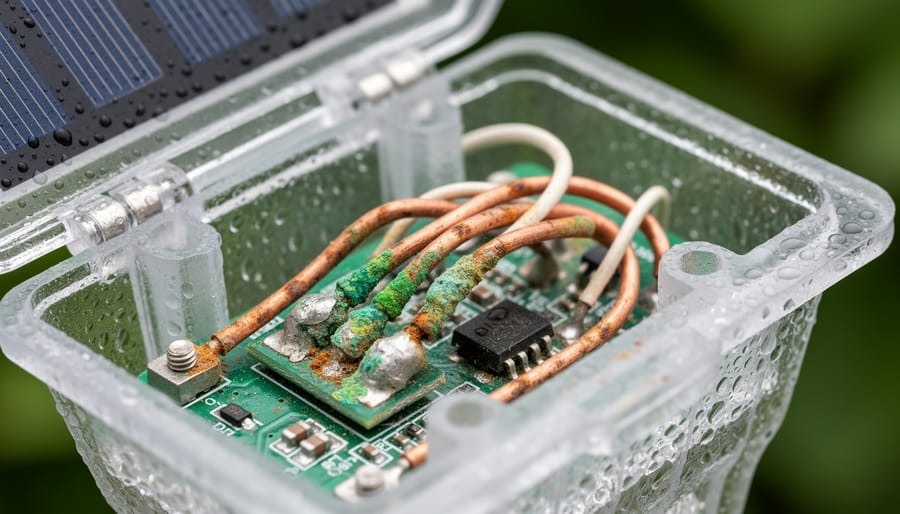
Water damage often catches homeowners by surprise, even with lights marketed as weatherproof. Over time, seals can deteriorate, allowing moisture to seep into the battery compartment or damage internal wiring. This is especially common in areas with harsh weather conditions or significant temperature fluctuations.
Sensor malfunctions represent another frequent problem. Your solar lights rely on photocell sensors to detect darkness and turn on automatically. When these sensors get dirty or fail, your lights might stay off at night or remain on during the day, draining the battery unnecessarily.
Finally, faulty wiring connections or corroded terminals can interrupt the flow of electricity within your solar lights. This is particularly common in older units or those exposed to high humidity.
The encouraging news is that each of these issues has a straightforward solution, and you don’t need to be an electrician to fix most of them. By working through a simple diagnostic process, you’ll likely have your solar lights shining bright again in no time.
Quick Diagnosis: Is Your Solar Light Actually Broken?
The 5-Minute Solar Light Health Check
Before diving into complex repairs, let’s start with a simple five-minute inspection that solves most solar light problems. Grab your lights and let’s walk through this together.
First, locate the on/off switch. It sounds obvious, but this tiny switch often gets accidentally flipped during lawn maintenance or weather events. Check underneath the light fixture or inside the battery compartment. If you find it in the off position, flip it on and you might be celebrating an instant fix.
Next, examine your solar panels closely. These small powerhouses need clean surfaces to absorb sunlight effectively. Run your finger across the panel. Feel any grit or notice a filmy layer? Dirt, pollen, bird droppings, and general outdoor grime can reduce charging efficiency by up to 50 percent. Give them a gentle wipe with a damp cloth and watch how they shine.
Now, assess your light placement. Are your fixtures tucked under tree branches, porch overhangs, or near brighter outdoor lighting? Solar panels need direct sunlight for at least six to eight hours daily. Even partial shade can significantly impact performance. Consider relocating lights to sunnier spots.
Finally, conduct a darkness test. Cover the solar panel completely with your hand or a dark cloth during daylight. If the light turns on, congratulations—your sensor works perfectly. If nothing happens, you’ll need to explore other quick solar light fixes like battery replacement or deeper troubleshooting.
This quick health check resolves about 70 percent of solar light issues without any tools or technical knowledge required.
When to Repair vs. When to Replace
Making the repair-or-replace decision comes down to three practical factors: age, cost, and performance history.
If your solar lights are less than two years old and this is their first issue, repair almost always makes sense. Cleaning panels, replacing batteries, or fixing a loose wire takes minimal investment and extends their useful life. You’re supporting sustainability by keeping functional products out of landfills.
However, replacement becomes the smarter choice when lights are over five years old with recurring problems. Battery replacements every few months add up quickly, often exceeding the cost of new, more efficient models. Today’s solar lights offer improved technology at surprisingly affordable prices.
Consider the 50-percent rule: if repairs cost more than half the replacement price, invest in new lights instead. Also factor in your time and frustration level. Constantly troubleshooting temperamental fixtures wastes energy better spent enjoying your beautifully lit yard.
For budget-conscious homeowners, try repairing one or two lights first. If they work reliably for several weeks, fix the rest. If problems persist despite your best efforts, that’s nature’s way of saying it’s upgrade time. Remember, newer solar lights are significantly more efficient, meaning you’ll actually improve your outdoor lighting while reducing environmental impact.
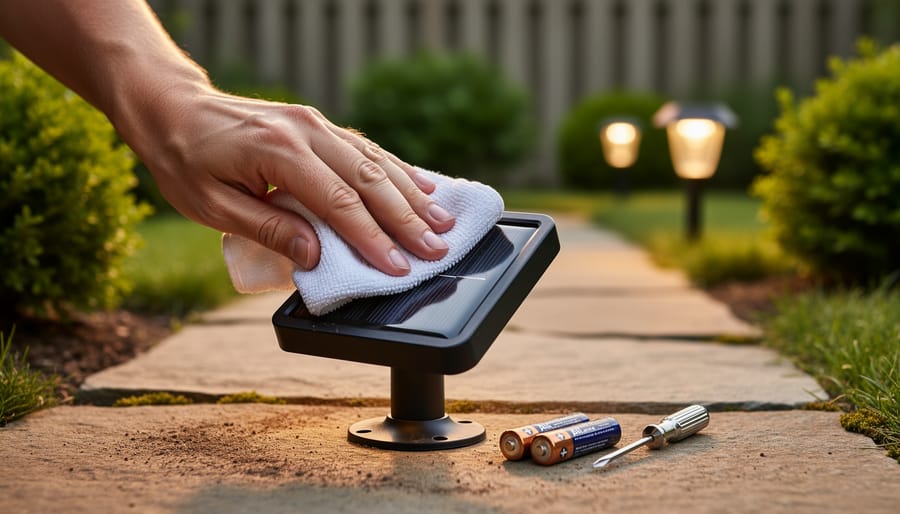
Fix #1: Clean Those Solar Panels (It’s Easier Than You Think)
What You’ll Need
The good news? You probably already have everything you need to troubleshoot your solar lights right in your home. For basic cleaning and maintenance, grab a soft microfiber cloth or old cotton t-shirt to gently wipe down the solar panels without scratching them. Mix a few drops of mild dish soap with warm water in a small bowl for stubborn dirt or grime. A spray bottle filled with clean water makes rinsing easier, though it’s completely optional. If you’re dealing with corrosion on battery contacts, keep a cotton swab and white vinegar handy. For checking connections, a small screwdriver set helps access battery compartments. You might also want a toothbrush with soft bristles for getting into tight spaces around the panel edges. These simple household items are your first line of defense in bringing your solar lights back to life, and they’re much more environmentally friendly than immediately replacing perfectly repairable lights.
The Cleaning Process
Cleaning your solar panels is surprisingly simple and can make a dramatic difference in performance. Start by choosing a cloudy day or early morning when the panels are cool to the touch. You’ll need just a soft cloth or sponge, mild dish soap, and water—nothing fancy required.
Begin by gently wiping away loose dirt and debris with a dry cloth. Next, mix a few drops of dish soap with lukewarm water in a bucket. Dip your soft sponge into the solution and gently wash the solar panel surface using circular motions. Pay special attention to the edges where grime tends to accumulate. For stubborn residue like bird droppings or tree sap, let the soapy water sit for a minute to soften the buildup before wiping.
Rinse thoroughly with clean water—any soap residue can attract more dirt. Dry with a microfiber cloth to prevent water spots that might block sunlight.
For optimal performance, clean your solar lights every two to three months, or monthly if you live in dusty areas or under trees. After a storm or heavy pollen season, give them a quick wipe-down. This simple maintenance routine keeps your lights shining bright and extends their lifespan significantly.
Fix #2: Replace Dead or Worn-Out Batteries
Signs Your Battery Needs Replacing
Your battery might be the culprit if you notice certain telltale signs. The most obvious indicator is when your lights start dimming unusually fast after sunset, sometimes going dark within just an hour or two. Healthy solar light batteries should power your lights for six to eight hours on a full charge, so anything significantly less suggests battery degradation.
Another clear warning sign is when lights won’t illuminate at all, even after a full day of sunshine. If you’ve already cleaned the solar panel and confirmed it’s getting direct sunlight, the battery has likely lost its ability to hold a charge. This is especially common with lights that have been faithfully serving your yard for one to two years, which is the typical lifespan for most rechargeable solar batteries.
You might also notice your lights flickering inconsistently or working some nights but not others, even when weather conditions remain stable. This erratic behavior often points to a failing battery that can’t maintain steady power output. The good news? Replacing batteries is straightforward and breathes new life into your lights, saving perfectly good fixtures from the landfill. Most solar lights use standard rechargeable batteries available at hardware stores, making this an easy and eco-friendly fix.
Finding the Right Replacement Battery
Finding the right replacement battery is easier than you might think! Most yard solar lights use one of three battery types: NiMH (Nickel-Metal Hydride), NiCd (Nickel-Cadmium), or lithium-ion. NiMH batteries are the most popular choice today because they’re environmentally friendlier and hold their charge longer than older NiCd versions.
To identify what you need, remove the old battery from your solar light’s compartment (usually located underneath or inside the fixture). Look for markings on the battery itself showing the type and size, typically AA or AAA. Note the voltage rating too, which is usually 1.2V for NiMH and NiCd batteries.
When shopping for replacements, avoid using regular alkaline batteries, as they won’t recharge properly in solar fixtures. Instead, look for rechargeable batteries specifically designed for solar lights. You can find affordable options at hardware stores like Home Depot or Lowe’s, online retailers like Amazon, or specialty solar equipment suppliers.
Pro tip: Many homeowners report success buying batteries in multi-packs, which reduces cost per unit and gives you spares for future replacements. Quality rechargeable batteries typically last 1-3 years, making this a cost-effective and sustainable solution for keeping your outdoor lighting shining bright.
Step-by-Step Battery Replacement
Replacing batteries is one of the simplest fixes that restores most solar lights to full brightness. Start by locating the battery compartment, typically found underneath the light cap or at the base of the fixture. Some models have a small screw that needs removing, while others simply twist open. Work during daylight hours for better visibility and always wear gloves to protect against corrosion residue.
Before touching anything, switch the light to the “off” position if available. Carefully remove the old batteries, noting their orientation and the positive and negative terminals. If you see white or green crusty buildup, that’s corrosion, which you can gently clean with a cotton swab dipped in white vinegar. Wipe the compartment dry before proceeding.
Install fresh rechargeable batteries, making sure they match the recommended type for your model. Most solar lights use NiMH batteries rather than standard alkaline ones. Double-check that you’ve positioned them correctly according to the terminal markings. Replace the cover securely to maintain the weatherproof seal. Give your lights 2-3 sunny days to fully charge before expecting optimal performance.
Fix #3: Troubleshoot the Light Sensor
Testing Your Light Sensor
Testing whether your light sensor is functioning properly is surprisingly simple and takes just a minute. The sensor—that small, usually circular component on top of your solar light—tells the unit when to turn on at dusk and off at dawn. When it malfunctions, your lights might stay dark all night or remain on during daylight, wasting precious battery power.
Here’s your quick diagnostic test: First, ensure your solar light has charged for at least one full sunny day. As evening approaches or in a darkened room, completely cover the sensor with your hand or a dark cloth. Within a few seconds, a working sensor should trigger the light to turn on. If it illuminates, congratulations—your sensor is doing its job! The problem likely lies elsewhere, such as dirty solar panels or a depleted battery.
If nothing happens after covering the sensor, try gently cleaning it with a soft, damp cloth to remove any dirt or debris that might be blocking it. Test again. Still no light? Your sensor may need replacement, or there could be a wiring issue between the sensor and the light unit. This simple test helps you narrow down the problem quickly, saving you time and helping you decide whether a DIY fix or replacement makes the most sense for your situation.
Cleaning or Replacing a Faulty Sensor
The sensor is your solar light’s “eye” that tells it when to turn on at dusk, and a dirty or malfunctioning sensor is one of the most common culprits behind lighting failures. The good news? This is usually an easy fix that takes just minutes.
Start by locating the sensor, typically a small circular component on top of the solar panel or light fixture. Gently clean it using a soft, damp cloth to remove dirt, dust, pollen, or debris that might be blocking its ability to detect light levels. For stubborn grime, use a mild soap solution and dry thoroughly. You’ll be surprised how often this simple cleaning restores full functionality.
After cleaning, test your light by covering the sensor with your hand in a dark room. If the light turns on, you’ve solved the problem. If not, the sensor itself may be faulty.
Consider sensor replacement if cleaning doesn’t work and your lights are older than three years. Most manufacturers sell replacement sensors for fifteen to thirty dollars, and installation typically involves disconnecting a simple wire harness. Check your product manual for compatibility information.
Here’s an encouraging reality: many homeowners report that regular sensor cleaning every few months prevents most issues entirely. It’s a small maintenance habit that keeps your sustainable lighting working beautifully year-round, reducing waste and maximizing your solar investment.
Fix #4: Address Wiring and Connection Issues
Inspecting for Corrosion and Loose Connections
Before you can fix internal problems, you’ll need to safely access the components inside your solar light. Don’t worry—this process is straightforward and doesn’t require special tools in most cases.
Start by removing the light fixture from its stake or mounting bracket. Most units simply twist off or slide upward. Next, locate the screws or clips holding the housing together. These are typically found on the bottom of the light or hidden beneath a rubber gasket. Keep track of small parts by placing them in a cup or bowl.
Once opened, take a moment to examine the interior. Look for white or greenish buildup on metal contacts—that’s corrosion, which blocks electricity flow just like rust on a bicycle chain. You might also notice wires that have come loose from their connection points or battery terminals that appear damaged.
Check each solder joint and wire connection carefully. Gently wiggle wires to see if they’re firmly attached. Sometimes a connection looks fine but is actually barely touching. This is especially common in lights that have been knocked around by weather or lawn equipment.
If you spot corrosion, you’re in luck—this is usually fixable. A simple cleaning with white vinegar on a cotton swab can restore conductivity. For loose wires, you may need to reconnect them or use electrical tape to secure the connection.
Take photos with your phone as you disassemble the unit. This creates a helpful reference when you’re ready to put everything back together, ensuring your repair succeeds on the first try.
Simple Repairs for Common Wiring Problems
Wiring issues can seem intimidating, but many problems have surprisingly simple fixes that take just minutes. Start by inspecting wire connections where the solar panel meets the light fixture. If you spot white or green crusty buildup around metal connections, that’s corrosion at work. Create a simple cleaning solution using equal parts white vinegar and water, then gently scrub the corroded areas with an old toothbrush. Rinse with clean water and dry thoroughly before reconnecting.
Loose wires are another common culprit. Check all connection points and ensure wires are firmly seated in their terminals. If you find frayed or damaged wire insulation, electrical tape provides a quick weatherproof seal for minor damage. Wrap the tape around the exposed wire in overlapping layers, extending at least half an inch beyond the damaged section on each side.
For more serious breaks or disconnections, soldering creates a permanent, reliable connection that withstands outdoor conditions better than tape alone. After soldering, always protect the joint with heat-shrink tubing or electrical tape rated for outdoor use. Remember, if you’re uncomfortable working with electrical connections or encounter complicated wiring scenarios, there’s no shame in consulting a professional. Your safety and your lights’ longevity are worth the investment in proper repairs.
Fix #5: Replace Burnt-Out LED Bulbs
While less common than battery or sensor issues, LED bulbs can eventually burn out after years of faithful service. The good news? This problem is relatively rare in quality solar lights, and when it does occur, it’s usually straightforward to fix.
Start by checking if the LED is actually the culprit. After ruling out battery and solar panel issues, turn on your light in a dark space. If you see a faint flicker or dim glow, the LED may be failing. If there’s absolutely no light despite a charged battery, the bulb or its connection could be the problem.
To replace an LED bulb, first disassemble your light fixture carefully. Most units have screws or clips holding the top section together. Take photos as you go to remember the reassembly order. Once inside, locate the LED component, which might be a single bulb or a small circuit board with multiple LEDs.
Here’s where it gets important: LEDs must match your light’s voltage requirements. Check the specifications on your original bulb or in the product manual. Common solar light LEDs operate at 1.2V to 3V. Using the wrong voltage can damage your entire system or create a fire hazard.
Purchase replacement LEDs from the manufacturer when possible, or source compatible ones from electronics suppliers. Installation typically involves desoldering the old LED and soldering in the new one, though some designs use simple plug-in connections.
If soldering feels intimidating, consider this an opportunity to upgrade to a newer solar light model instead. However, for those comfortable with basic electronics, this repair extends your light’s lifespan significantly. Regular maintaining your solar lights helps prevent premature LED failure and keeps your outdoor spaces beautifully illuminated for years.
Prevention: Keep Your Solar Lights Working Year-Round

Monthly Maintenance Checklist
A little preventive care goes a long way in keeping your solar lights shining bright year-round. Set a simple reminder on your phone to clean the solar panels once a month using a soft, damp cloth. Dust, pollen, and bird droppings can reduce charging efficiency by up to 30%, so this two-minute task makes a real difference.
Take a quick walk around your yard during the day to check if any lights have shifted or become shaded by growing plants. Seasonal changes mean the sun’s angle shifts throughout the year, so what worked in summer might need adjustment in fall. Simply repositioning lights to capture more direct sunlight can instantly improve performance.
Every three months, test your batteries by covering the solar panel and checking if the light turns on. If it’s dim or doesn’t illuminate, it’s time for a battery swap. Most rechargeable batteries last 1-2 years, so marking your calendar for seasonal checks helps you catch issues before complete failure.
Before winter arrives, give your lights extra attention. Clean them thoroughly, trim back any overgrown vegetation, and consider removing batteries in areas with harsh freezing temperatures. This simple routine keeps your solar lights working efficiently and saves you money on replacements.
Winter Care and Storage Tips
Winter poses unique challenges for solar lights, but with proper care, your sustainable lighting investment can weather any storm. In regions with heavy snow, ice, or extended freezing temperatures, you’ll want to give your lights extra attention.
If temperatures regularly drop below -4°F (-20°C) in your area, consider bringing solar lights indoors. Extreme cold can damage batteries and reduce their lifespan significantly. Remove the batteries before storage and keep them in a cool, dry place—not somewhere warm, as temperature fluctuations cause condensation damage.
For lights staying outdoors, clear snow and ice buildup promptly to ensure panels can capture whatever winter sunlight is available. Shorter days mean less charging time, so your lights may not shine as brightly or as long—this is completely normal and doesn’t indicate malfunction.
When storing lights for the season, clean them thoroughly first. Remove batteries and store lights in a moisture-free location like a garage or shed. Wrap them in newspaper or bubble wrap to prevent scratches. This simple routine protects your investment and ensures your lights are ready to illuminate your yard when spring arrives. Proper winter care means you’ll spend less time troubleshooting and more time enjoying reliable, eco-friendly outdoor lighting year after year.
When to Upgrade: Signs It’s Time for Better Solar Lights
Sometimes the most sustainable choice is knowing when to let go. If you’ve cleaned panels, replaced batteries twice, and still find yourself troubleshooting the same lights every few weeks, it’s probably time for an upgrade.
Consider replacement when your lights are more than three years old and require constant attention. Older solar technology simply can’t match the efficiency of modern panels and LED components. If your lights barely last two hours after a full sunny day, or if the plastic housing has become brittle and cracked, these are clear signals that repairs won’t provide long-term value.
When shopping for quality replacements, look for lights with monocrystalline solar panels, which outperform cheaper polycrystalline versions by 15-20 percent. Check that batteries are easily replaceable, with standard sizes like AA rather than proprietary options. Quality solar pathway lighting should offer IP65 or higher weatherproofing and come with at least a two-year warranty.
Pay attention to lumens ratings too. Modern solar lights should provide 15-30 lumens for ambient lighting or 100+ lumens for security purposes. Features like automatic dusk-to-dawn sensors and motion detection add convenience while extending battery life.
Remember, investing in reliable solar lights means fewer repairs, better illumination, and continued energy savings. Sometimes upgrading isn’t giving up on sustainability, it’s embracing better technology that serves your outdoor spaces more effectively for years to come.
You’ve now got a complete toolkit for diagnosing and fixing your yard solar lights, and that’s something to feel good about. By taking the time to troubleshoot rather than immediately replacing your lights, you’re not only saving money but also reducing waste and keeping functional products out of landfills. Every solar light you repair is one less item manufactured, shipped, and eventually discarded.
The beauty of solar lighting is that most issues are surprisingly simple to fix. Whether it’s giving those panels a good cleaning, replacing an inexpensive battery, or adjusting the placement for better sun exposure, these solutions are well within your reach. Many homeowners who’ve followed these steps report getting years of additional life from lights they almost threw away. One property manager shared that by simply cleaning panels and replacing batteries across their commercial landscape, they extended the life of 50 lights that would have cost thousands to replace.
Remember, solar technology works for you when you work with it. Regular maintenance takes just minutes but pays dividends in reliability and performance. Your lights are designed to be user-serviceable, so don’t hesitate to open that battery compartment or reposition a fixture. You’re capable of handling these repairs, and each successful fix builds your confidence for the next one.
If you’ve exhausted these troubleshooting steps and your lights still aren’t functioning, then replacement might be necessary. But chances are, you’ve already solved the problem and your yard is glowing beautifully again, powered entirely by the sun.


